
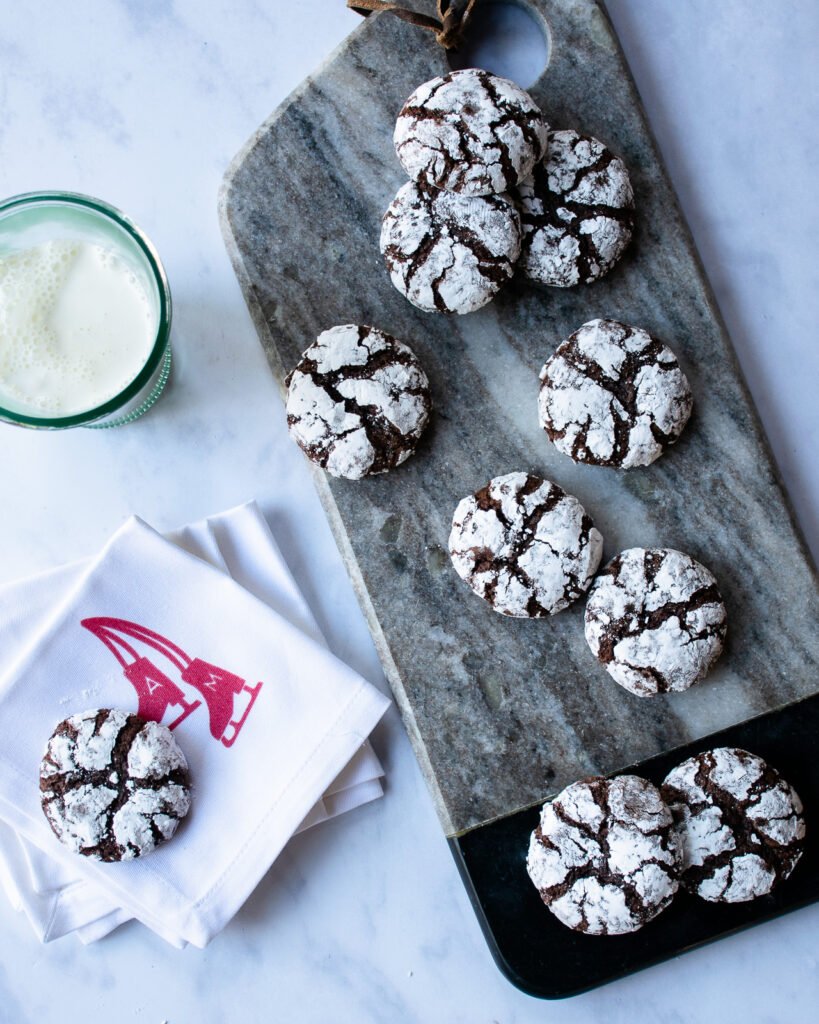
Chocolate Crinkle Cookies have to be one of the prettiest cookies at the holidays. Growing up in western Canada, snow was always on the ground at Christmastime without fail, and the look of chocolate crinkle cookies with their snowy appearance just screams “winter treat” to me.
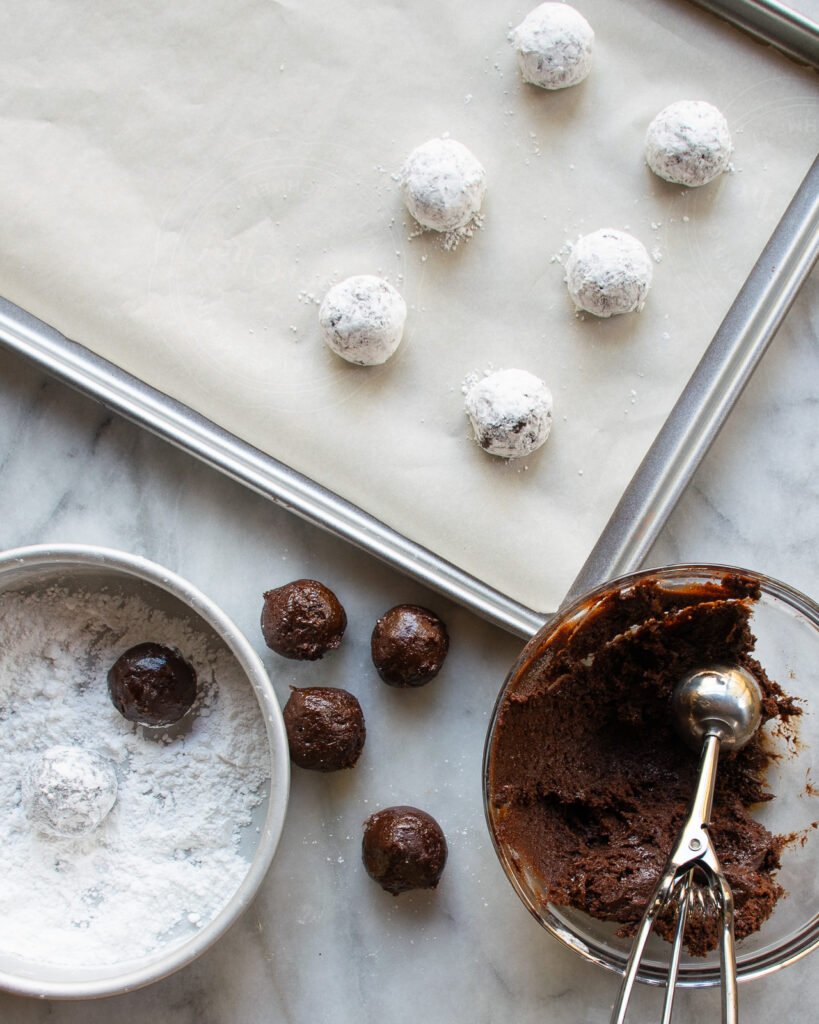
They are a fun cookie to make because they go into the oven looking one way (like well crafted snowballs), but come out of the oven looking completely different. The dough is soft and tender and melts in the oven, flattening into a beautiful treat. Making these treats is easy. You just need to beat the dough together and then heed my advice to let the dough chill for at least an hour – it’s much easier to work with cool dough than with room temperature dough.
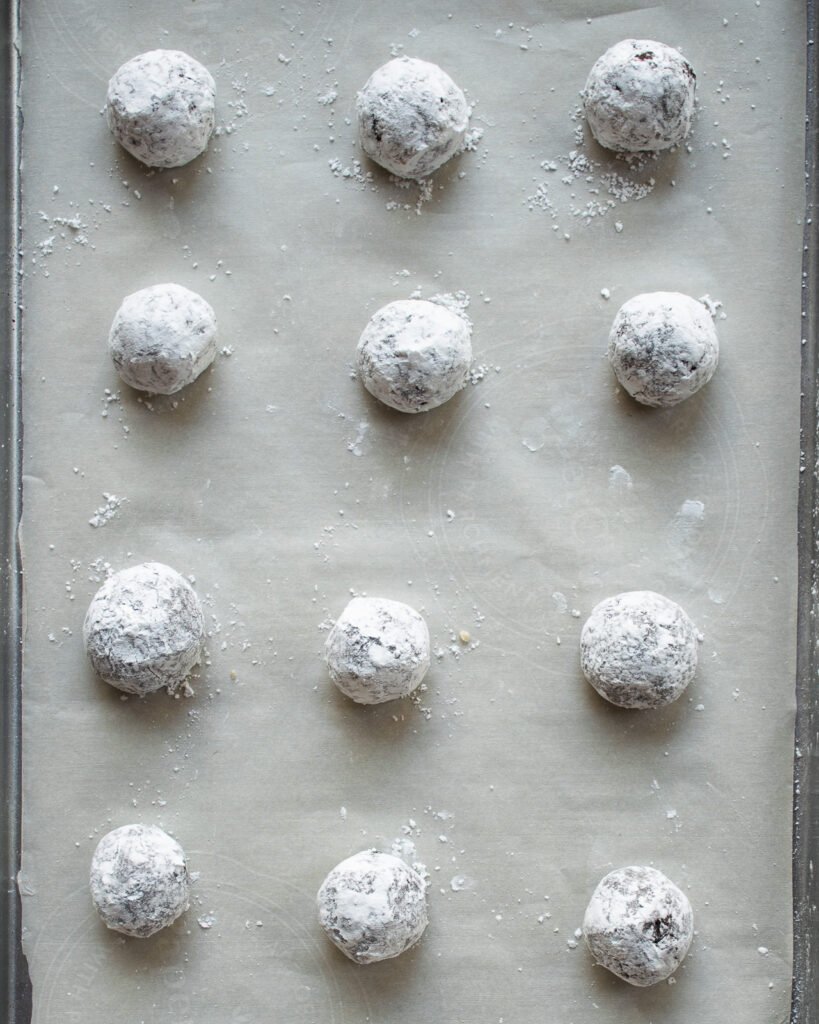
Roll the dough into balls and then coat each ball in the sugar mix and space them out properly on the cookie sheet.
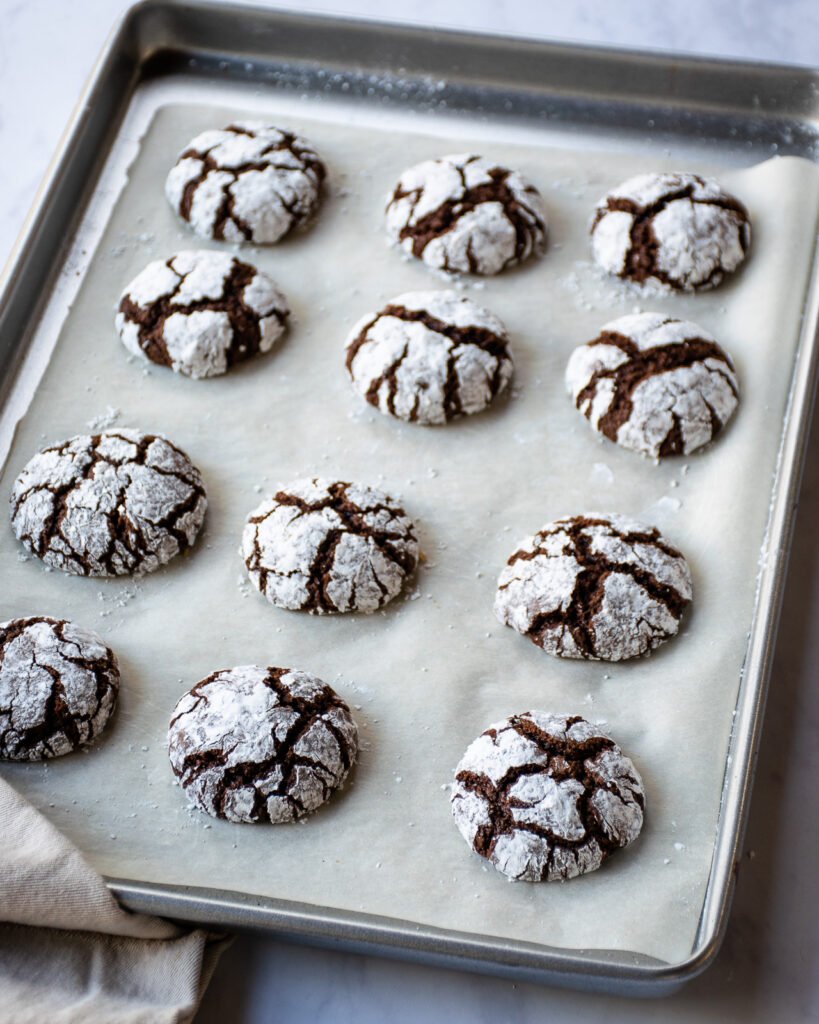
When they come out of the oven, the powdered sugar coating will have cracked to expose the delicious soft chocolate cookie. Let them rest on the baking sheet for a few minutes before you try to transfer them to a cooling rack.
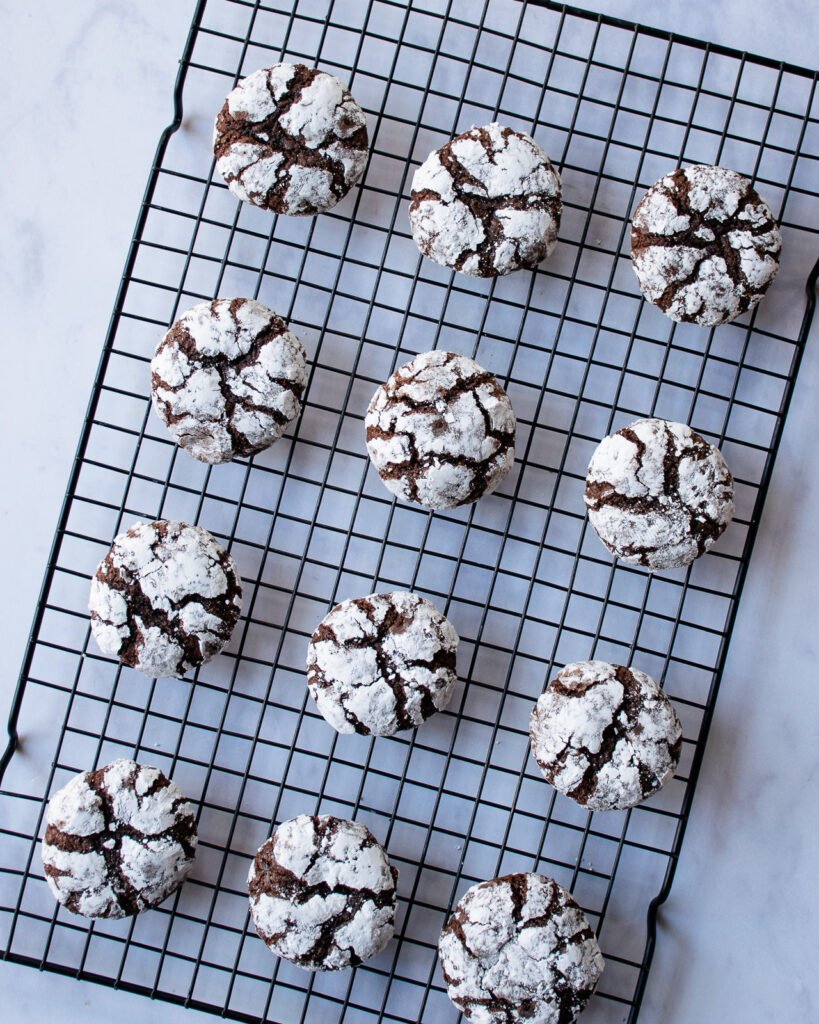
Then, just try to keep your hands off them as they cool completely. Well… maybe you can try just one (no-one will notice, will they?).
The winter-y appearance of these cookies makes them a perfect treat to leave out for Santa Claus on Christmas Eve. The only question is … how many would Santa like to enjoy?


Easy to make and delicious! Love these. Will make again.
I’ve mad them and they are delicious. I will be making them aging real soon. Thank you Meredith, you are the greatest.
I made these with added chopped cherries. They were voted #1 by all my grandchildren (and the rest of us). They are a truly beautiful cookie!
Can these be frozen? I’m not sure I can leave them around for a couple weeks.
Ha! I wouldn’t be able to leave them around! Yes, you can freeze them as balls and then let them defrost for 20-30 minutes on the cookie sheet before baking. They may take a minute or two longer to bake.
Can these be frozen so I can make ahead? Thanks
Sure. Let them defrost for about 20-30 minutes on your countertop before baking. They may take a minute or two longer.
Easy to make and delicious🌲🌲
I made these but something didn’t work. They are still pretty much round, dry as can be and don’t have a great taste. Not sure what I did wrong?
Hi Sande. I’m not sure what went wrong for you. The dough for these cookies is actually pretty wet from the start, so perhaps you mis-measured or left an ingredient out by accident? The flavor could only be affected by the oil and the cocoa powder – everything else is pretty standard. There is a chance your oil might have turned or the cocoa powder is just not one that you like the flavor of. I wish I had a better answer for you, but without actually being there, it’s hard for me to say. Hope you try again.
My family’s new favorite holiday cookie. So easy to make. You have to guard them carefully or they disappear right off the cookie sheet. Thx Merideth
I just finished baking these. They may be delicious, but what a mess to make. I had them in the refrigerator for 24 hours, but still not easy to make into balls. I’ve read and re-read the receipe, and I did everything right. They just didn’t set up. Sorry…. I know they taste so good!!!
Sorry you had trouble, Susan. They do have a sticky batter and take a little patience to roll, but it pays off. Try freezing the batter a little next time, or wet (yes, with water) your hands before you try to roll the dough. The dough won’t stick to a wet surface.
My new favorite Christmas cookie! I’m embarrassed to admit how many batches I’ve made of these since I discovered the recipe a few weeks ago. Delicious!
Big yum on these! I did cut the amount of confectioners sugar down to 1/4 cup and granulated down to 1 tablespoon, seemed less messy that way.
Made these this year! Absolutely excellent!
We made these for Christmas instead of our usual cut out recipe. They were very good, to me they tasted like a brownie in a cookie shape. Will be doing these again.
Made these again today! We love them any time of the year.
Going to try these using butter, hope they turn out.
These cookies have a fudge-y, brownie-like center, which is why I use oil. I did test this recipe several times to get the consistency of the dough just right so they weren’t too flat or too dry. So I can’t be sure how an equal substitution of butter will work out, but let us know if you try it.
Question – I just mixed up this dough and it was very wet, almost brownie consistency. Will it set up more for rolling after it’s refrigerated?
I hope you had success with your cookies. This is a wet and sticky dough and it does set up after being refrigerated for at least an hour to overnight. But the it should not be loose like a brownie batter.
Meredith, I made these cookies today and they are so good!!!
Meredith, I made these today, first batch spread out and were flat. I subsequently saw your video on Facebook on creaming butter and sugar and realized I used practically melted butter; tried again and they were perfect. Love your videos! (Miss you on QVC)
What kind of cocoa powder do you recommend?
Hi Bev. I don’t have a particular brand of cocoa powder that I recommend, but I do always tell people to make sure they are buying unsweetened cocoa powder and to make sure the recipe is calling for either regular cocoa powder or Dutch-processed cocoa powder. Dutch-processed cocoa powder has an alkali added to it making it milder and darker in color. Because of the alkali added to Dutch processed-cocoa powder, it does make a difference in recipes so always follow what the recipe calls for.
Meredith, I posted the question about the consistency of the dough…well, they turned out awesome! I tried to make this type of cookie several years ago and the dough was so sticky that I couldn’t roll it into balls. I left the dough in the refrigerator overnight this time. The first one rolled was sticky, so I decided to scoop with my cookie scoop and release it right into the powdered sugar to shape and cover. This turned out great! My daughter has decided this might be her new favorite cookie!!
I tried to make these today. After refrigerating dough, it was like thick brownie batter rather than dough. Doesn’t roll into balls. Had to drop into powdered sugar using scoop. Taste like brownies, round and flat in shape. Going to let the rest of the batter refrigerate over night to see if it will stiffen in order to roll into balls. ???
The longer the dough is chilled, the easier it is to roll into balls. Keep in mind it will always be a sticky dough. Dip the scoop or spoon into some warm water to help drop it in the powdered sugar. You can then roll it into a ball. If it way to thin, add a few more tablespoons of flour to the dough.
I made this recipe but it never got firm enough to form into balls. Is there something else I can do with the batter? Also, I only had jumbo eggs. Could that have been why it wouldn’t get firm? Thanks
Hi Carol. Jumbo eggs would definitely make the batter more wet. You can simply add additional flour, a couple tablespoons at a time until the dough is firm enough. Keep in mind, it should still be a sticky dough. You can dip your scoop or spoon into a little warm water to make it easier to roll. Once you get it together, roll in the powdered sugar and form the dough into a ball.
I made these last year for Christmas and am planning on making them again this year. Everyone loved them.
Tell me why the confectioners sugar melted when I baked the cookies in the oven.
There may have not been enough confectioners sugar on the dough. It is a wet sticky dough so be sure to roll a heavy coat of the sugar on the cookie balls. This recipe mixes the confectioners sugar with a little granulated sugar to prevent it from soaking into the dough. If you are still having a problem, you can try rolling the dough balls in granulated sugar first and then coating it the powdered sugar. Make sure the dough is chilled and you bake them shortly after coating the dough in the sugar mixture. Also if there is a lot of humidity in the air, it could soak into the confectioners sugar causing it to start to melt.
Hi Meredith, should I freeze before or after rolling in sugar.
Thank you
If you’re going to freeze the dough to cook at a later time, I would freeze the balls before rolling in sugar and then roll in powdered sugar just before baking.
ML
Easy to make, beautiful end product. I’m not a big fan of the taste, but my “roommates”, aka kids enjoyed them. 😁
Thanks for sharing this amazing recipe.my family loved it.will be sharing this recipe with my friends.they will like it.
This is a great recipe!! I had this one exactly over 20 years ago & lost it & am so grateful to have it once more!!! They are excellent & my favorite!!!
Haven’t tasted them yet but assembly was terrible. The dough was extremely sticky and very hard to work with.
I made the dough yesterday and refrigerated overnight. I actually thought I might have missed something in the ingredients – but no, followed precisely.
They are not worth the trouble to make. I had to oil my hands to get them into a ball, and even then after a couple of rolls – wash hands and start over!
The dough will be soft and sticky. This is needed to get the soft fudgy center in the cookies. It helps to use a tablespoon ice cream scooper to portion out the cookies and you can also wet your hands with a little water to make it easier to roll out the dough.
My dough was very soft even after being in the refrigerator overnight. I worked the dough again, then mixed in 1/4 cup flour, mixed in another 1/4 cup flour, the a final 1/4 cup flour. This dough was still soft, but managed to form into ball-like shapes. Rolled in the sugars mixture and baked. After that the cookies turned out great. Pretty with the crinkled tops and good chocolate flavour.
The dough will be sticky and soft, but you still should be able to roll them into balls. After chilling, you don’t need to work the dough again, you can just roll the dough into balls. It helps to use a tablespoon ice cream scooper and then wet your hands with a little water when you roll them into balls. Great that adding additional flour seemed to help to give you good results!
Excellent! Moist & great taste! Made these twice already. Recommend overnight refrigeration & roll quickly since dough can get very sticky, Added to our list of annual Christmas cookie recipes. Thank you Meredith!
These are so cute! I didn’t realize how easy these are to make. I’ll definitely have to make these with my kids.