What is a pierogi?
In the simplest of terms, a pierogi is an eastern European dumpling. In more detail, a pierogi is a dumpling made by wrapping an unleavened dough (no yeast, eggs or chemical leaveners) around a filling that is usually potato-based, but homemade pierogies can include almost anything. They can be savory or sweet; they can be boiled or boiled and then fried; they freeze well and they makes people happy. What more could you ask for?
I’ve always loved pierogies. I can remember going to the house of my friend’s Ukrainian grandmother in Alberta, Canada as a child. She was making homemade pierogies by hand that day and all the kids had a pierogi-eating contest. I came in second. I had NINETEEN… and I came in second!
Recently, I had the pleasure of making pierogies by hand with another Ukrainian grandmother. This time it was the 96-year old mother of a friend of mine. She told me what to do and I did it. Though I’d like to say it was an intense and challenging project, I have to admit it was so delightfully easy and the pierogies turned out perfectly. We smothered them in butter and onions and I only ate nine, but I still feel like that is a respectable amount (for a glutton)!
Pierogi Dough
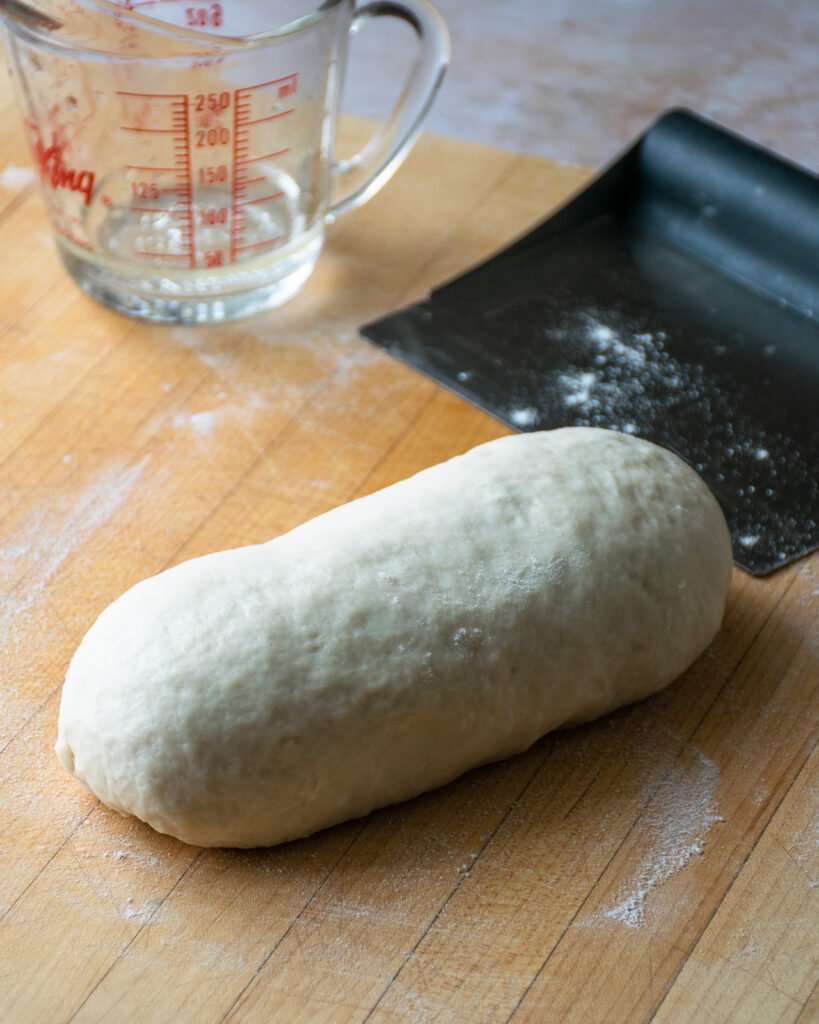
There are only four ingredients in pierogi dough: flour, salt, water and vegetable oil. You could use a hand or stand mixer to combine the ingredients, but honestly it takes so little time using just your hands and your hands are much easier to clean. As you bring the dough together with your hands, you’ll know if you’ve added the right amount of liquid to flour if the bowl you’re using ends up relatively clean. If it’s too sticky, add more flour. If it’s too dry, add more water. It’s as easy as that.
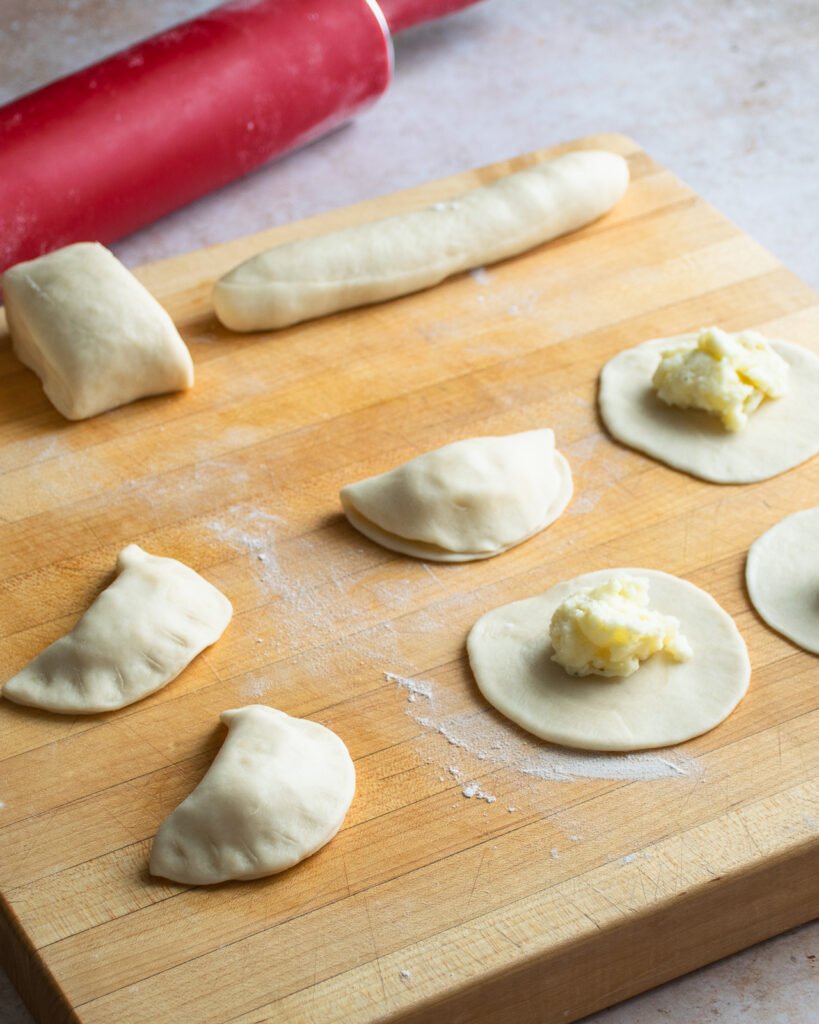
Divide into 24 portions
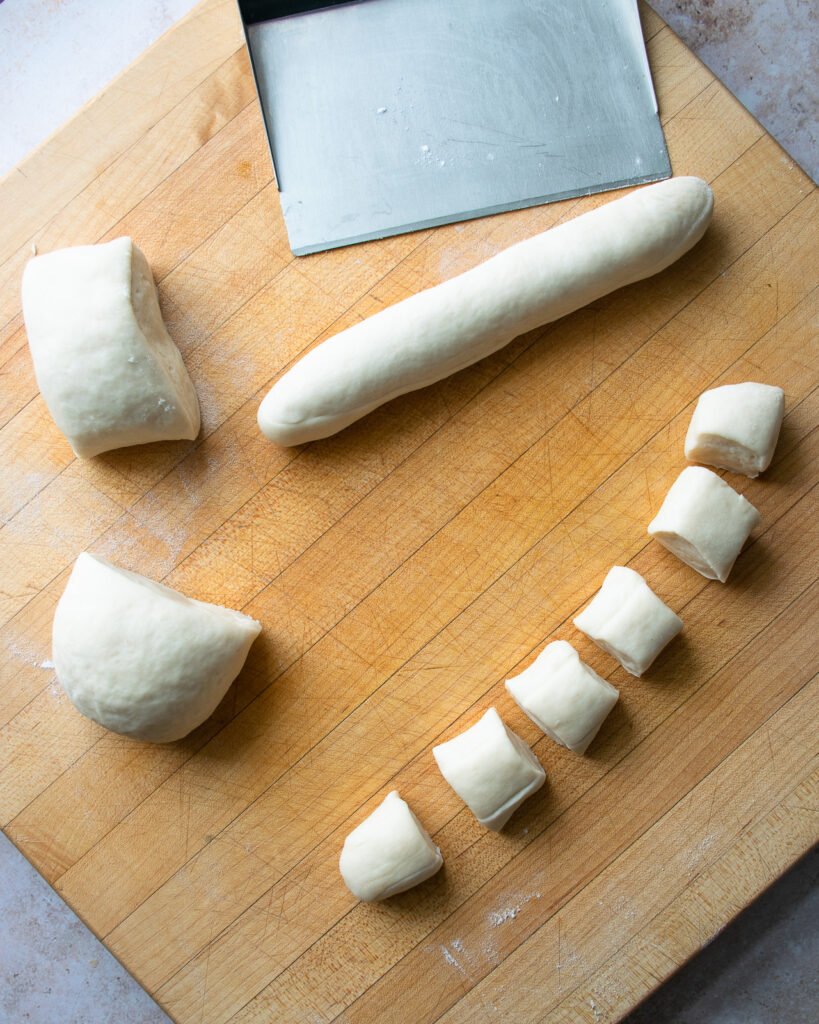
The important thing to remember whenever you are working with a dough of any kind is that doughs need to rest. After you’ve kneaded the dough for the first time, let it sit for 10 to 15 minutes before dividing the dough into 24 portions. Divide the dough into 4 pieces first. Then, roll each quarter into a log and divide that log into 6 pieces. Then… let those little pieces of dough rest for 10 minutes or so before you try to roll them out into circles.
BIG Dough Rolling Tip
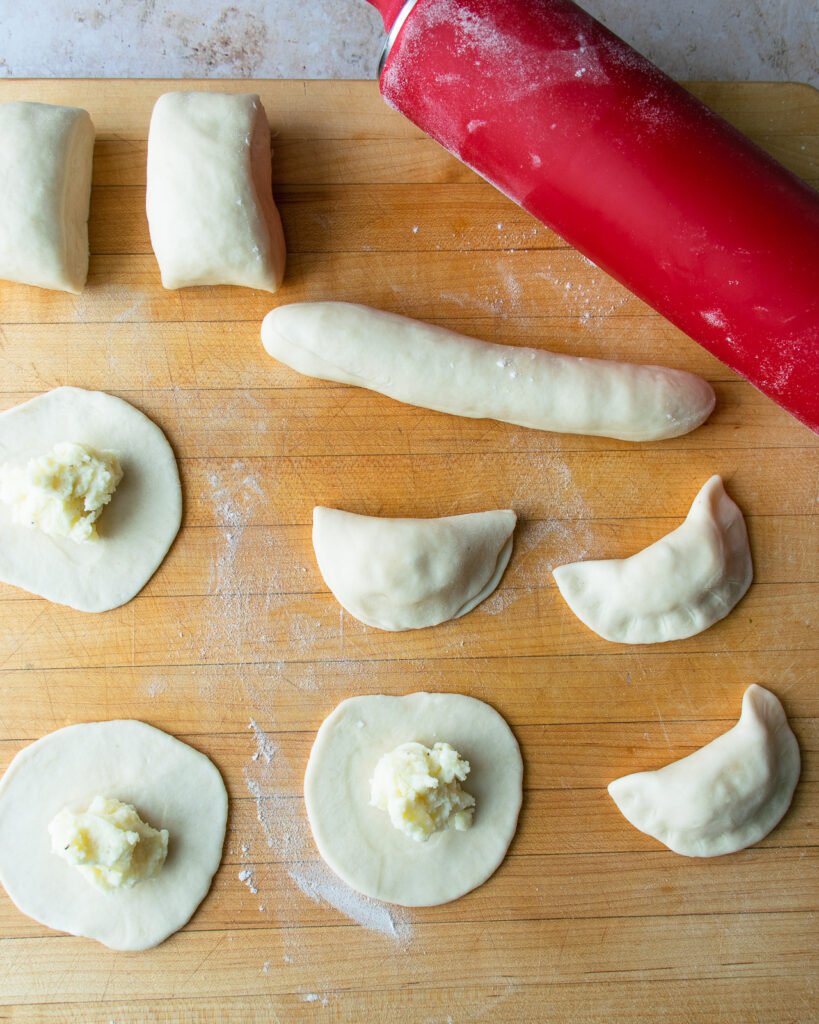
If you are aiming for a certain shape when you’re rolling doughs, you have a better chance of arriving at that shape if you start with that basic shape. That means, if you’re trying to roll out pierogi dough into a circle, start with a little piece of dough that is roughly a circle. You’ll see in the video below that I cut the log of dough and then flatten each piece of dough with the cut edge down so that the piece of dough is circular. Start with a circle, end with a circle. Of course, these are your pierogies so whatever shape you get is perfect.
Potato and Cheese Stuffed Pierogies
Make the potato filling by peeling and boiling a russet potato. When it is super soft and still warm, mash it with the Cheddar cheese and season it to taste. You’ll be surprised how far just one potato will go – it’s ample to fill all 24 pierogies.
Pinch hard… and then pinch again!
I won’t be able to console you if you don’t seal the pierogies well enough and they burst open in the water when you boil them. So, pinch the seams of each pierogi together as though that pierogi were your older brother who had just eaten the last pierogi. Then, go over the seam and pinch it again.
How to Finish Pierogies
Now, I don’t mean how to finish eating pierogies (I can thoroughly instruct you on how to do that later if you need my help). I mean how do you finish preparing the pierogies now that you’ve made them. The pierogies need to be boiled in salted water. Make sure you use a big pot with lots of water so those dumplings can move around. Add them to the pot when the water is at a rolling boil and stir them once – just to make sure nothing is stuck to the bottom. They will only take about two to three minutes and then they will start to float. Let them float for about 30 seconds and then remove them with a slotted spoon.
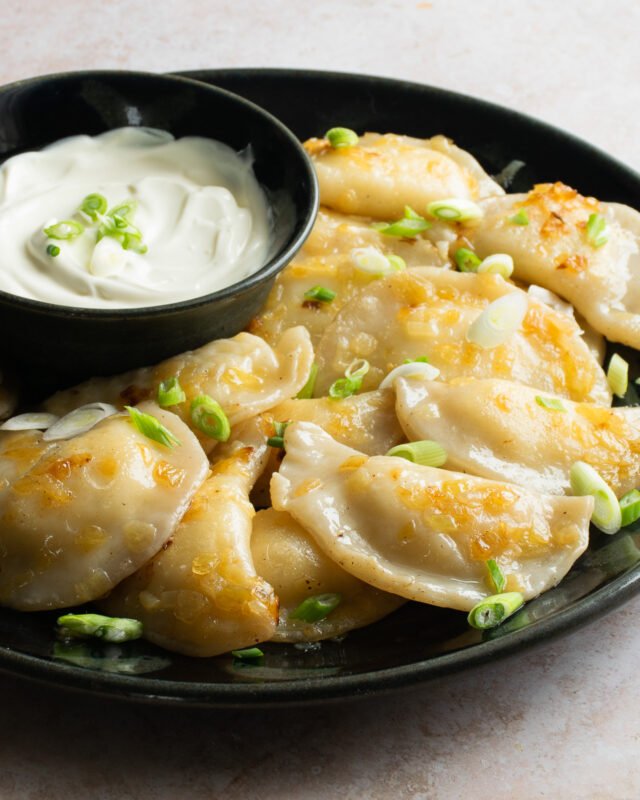
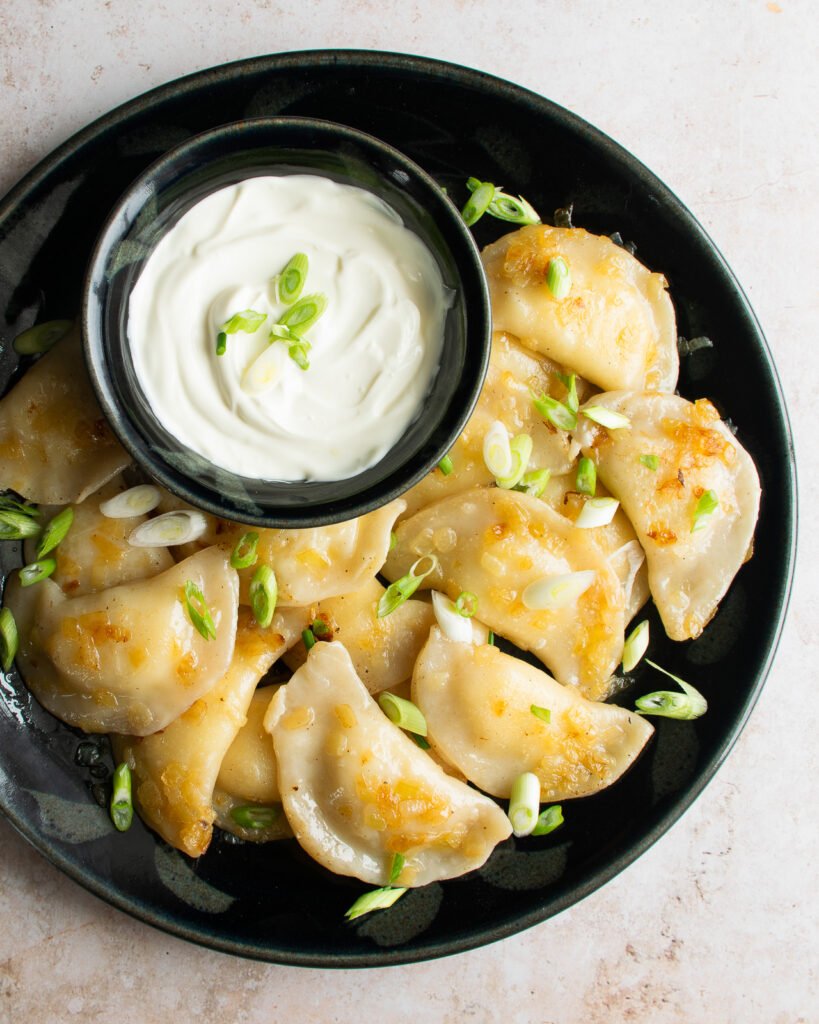
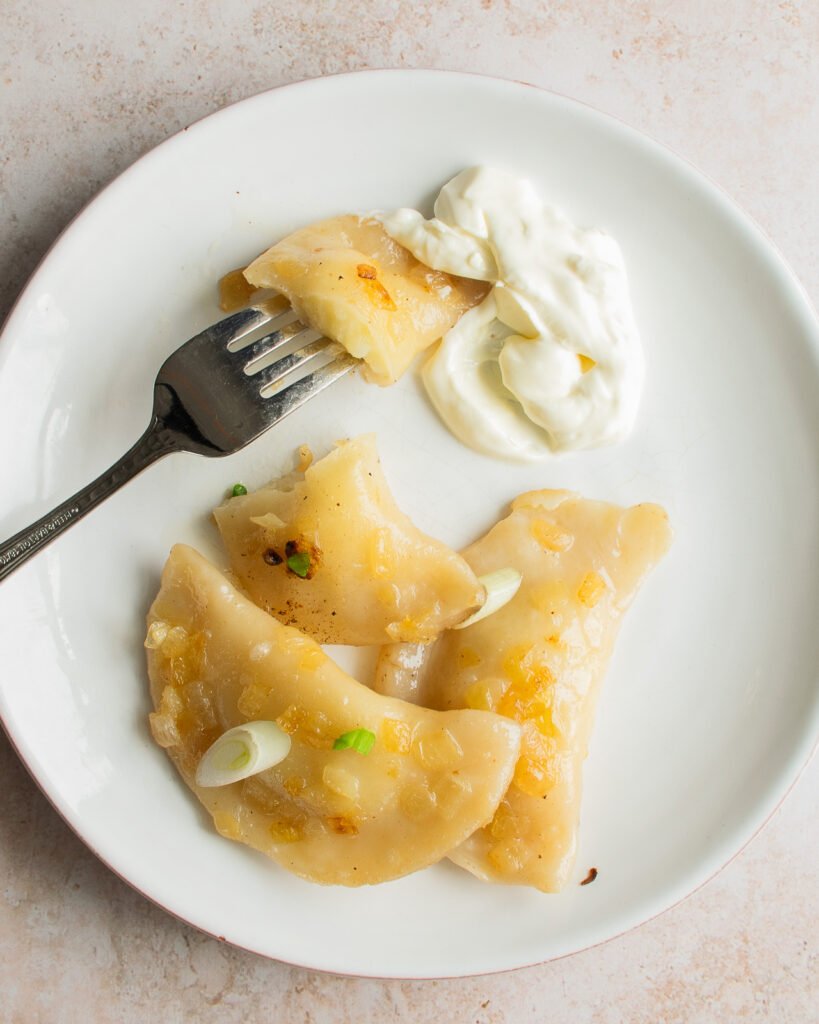
Usually, the boiled pierogies are then tossed with either just melted butter, or onions cooked in butter, or onions cooked with bacon, or with sauerkraut, with kielbasa, or honestly any way you like them. The photo below shows you the pierogies with just onions and butter, while the video shows you caramelized onions and bacon. I won’t say no to either! You can even use pierogies in a casserole bake like this Kielbasa, Pierogies and Sauerkraut Bake.
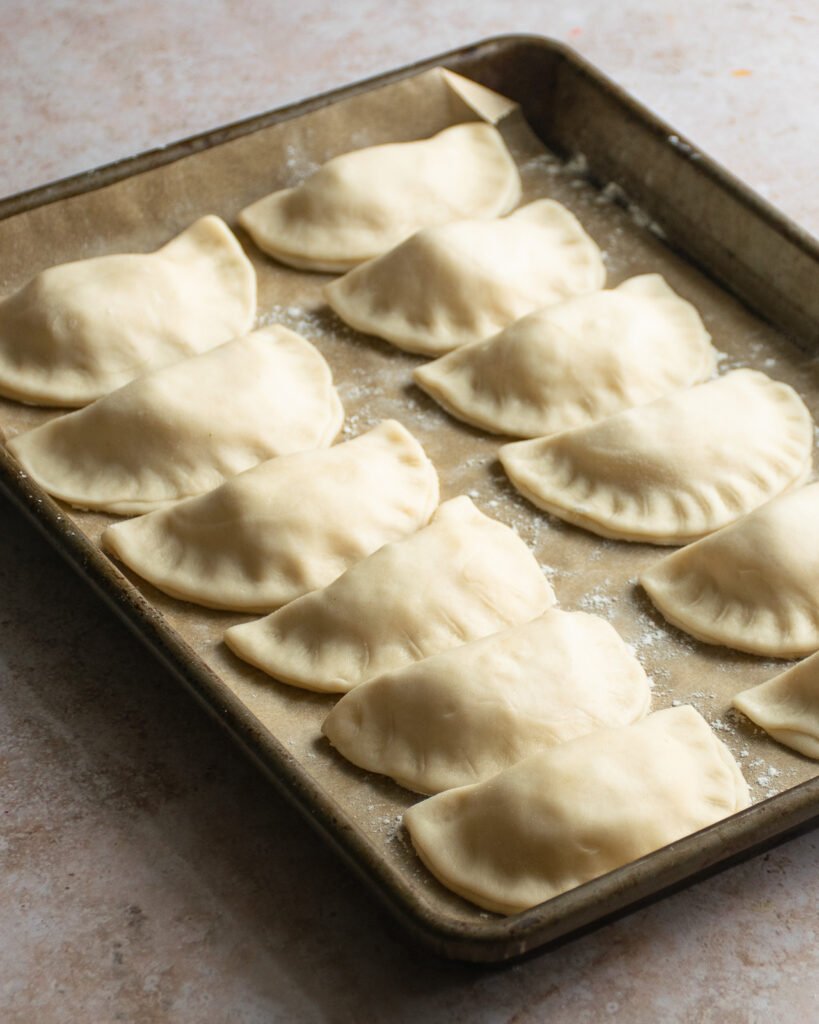
How to Freeze Pierogies
As I mentioned before, homemade pierogies freeze really well. Once they are shaped and before you boil them, pop them into the freezer on a baking sheet. Once they are frozen, transfer the frozen pierogies to an airtight bag and return them to the freezer with as much air removed from the bag as possible. When you’re having a craving, simply drop the frozen pierogies into the boiling water. They will take longer to cook, but they will eventually float. You’ll wait 30 seconds and then remove.
How to Eat Pierogies
I could go on and on, but I think you probably have this area covered.


I absolutely love pierogies, and this recipe looks really easy to do. I have one question. Once you boil them, can you put them in the air fryer for the second step? If so, how high should the temp be and for how long?
Yes, you can definitely put them into the air fryer for the second step. Make sure they are tossed in oil or melted butter so that they don’t stick to the bottom of the basket. Try 380ºF for about 5 to 10 minutes, or until they have the color you like.
Meredith
Can these be made with almond flour?
Stomach can’t handle carbs
Thanks
Joan
(A past QVC follower)
Hmm.. I’ve never tried. I don’t know if the almond flour would hold together, especially when dropped into boiling water. If you give it a try, let me know.
The plural for pierogi is pierogi not pierogies
Many people do write “pierogi” as the plural version, but both “pierogi” and “pierogies” are acceptable according to the Merriam-Webster or Oxford English Dictionaries.
Step by step the recipe and video are spot on. My only variance is I add 2 oz creme cheese with the cheddar. Love perogis, love you Ms. Blue Jean Chef! Thank you.
Hi Meredith,
You probably figured you would be getting everyones different variations.
My grandmother was from Budapest and over the years she and my mom & dad tweaked her original version. I would think they were probably very bland originally and I don’t remember ever eating an original version. Their tweaked version is the one we have used ever since and they have a TON more flavor. They used shredded sharp yellow cheddar cheese (we like the orange color of the potatoes)! But they caramelized chopped onions in butter then drained them and added them to the potato mixture. Yes, they were also served with more caramelized onions in butter with sour cream. The flavor is phenomenal.
What are the ones made with “sweet” cheese? Is that ricotta? My favorite. Looks good.
Hi Mary. I would suggest ricotta or cream cheese for a sweet filling, along with fruit or jam.
Can you use any of the prepared doughs, such as pizza, puffed pastry, pie, or crescent? I don’t like messing with flour, and it would be much quicker if the dough
was already made.
Hi Lyn. You could substitute wonton wrappers but it won’t be quite the same.
ML
Just like Babci’s.
Although I haven’t made this recipe yet, I know me…. I’ve been looking for a good Pierogi recipe. I just found it! Thanks Meredith! And the Caramelized Onions too? Yeah! “we” just changed my diet! Thanks ever so much!!
I live in Pennsylvania and the sweet version ,is made with something called “Farmers Cheese” a sweet version of ricotta. Give it a try and let me know what you think. Thanks!
Can I make these with a gluten free flour?
I haven’t tried making them with gluten-free flour, I’m afraid. You could give it a try.
Hello Maredith, our family has been making these for years as a Christmas tradition. We’ll make hundreds at a time. However, our dough recipe uses, eggs and sour cream along with the flour. Besides the potato/ sharp cheddar cheese, we also make a sourkrout/bacon, and lastly a mushroom. My father in law loved prune, however since his passing we stopped making that one.
It all sounds delicious!!
I love pierogies, I had a friend that deep fried hers. Is this something you have done, I don’t know if she boiled them first.
Hi Peggy. I haven’t deep fried pierogies, but I have pan-fried them after boiling first. If you decide to try deep frying them, boil them first, dry them well and then deep fry.
My mom (who would have been 96 this year) used to roll out the dough flat, cut it in rectangles, added the potato and cheese filling and then folded the rectangles over the fillings. I think she used to use a fork to close them, but I don’t remember that part. Your way is interesting. I do miss those days of working with her to make them!
Can these be cooked in the airfryer?
Hi Ruth. After you boil them, you can spray the pierogies with oil and air fry them instead of pan frying them if you like.
Today was my first attempt at making these! The recipe was easy to follow and the video was helpful! I think they were very tasty and will definitely make them again! Would like to try with a blueberry filling! The possibilities are endless! Thank you!
Recipe is wonderful! Really-why comment on what the plural of Pierogi is! Comment on recipe! Stop picking on nonsense!
I just made these! They were delicious although time-consuming it was not difficult. I love the idea of breaking up the dough into pieces because when my grandmother would make these she would roll out a giant piece of Dough and I always have trouble working with a lot of Dough so your technique was spot on. thank you!
My husband’s Volga Deutch mama taught me to fill them with a mixture of dry curd cottage cheese, chopped green onions, and egg. After we boil them, we drain, then fry in a little bacon grease, and serve with bacon and sour cream. So good! And I think of her, every time I make it….
Have you ever considered sweet potato and bacon filling?
Great idea Kathy. I have not tried sweet potato filling yet. I usually fry the bacon and serve it on top of the pierogies, but I am sure it would be delicious in the filling too!
delicious pierogies! somehow, followed the recipe exactly and only had enough filling for half the wrappers tho… oops? im wondering if it would’ve made a difference to have some of the ingredients listed by weight, like the potato
Turned out pretty delicious 😊
I will need to freeze some of these. At what stage do you freeze them?
Hi Mary. I would freeze them before boiling. Freeze them on a baking sheet and then once they are frozen, transfer them to a zipper sealable bag.
These are easy and delicious. The hardest part for me was getting the right size circles. Practice will help.
How do I make these with just farmer’s cheese. My favorite.
Hi Mary. If you want to make pierogies with farmer’s cheese, mix up 1 pound of farmer’s cheese with one beaten egg and ¼ – ½ cup of sugar (to taste) instead of using the potato filling.
Years ago my polish neighbor would give me homemade pierogi es filled with farmers cheese. Did you ever try that filling? Also did you ever use whole wheat flour?
Hi Cindy. I haven’t made the farmer’s cheese filling, but it’s quite simple to make – 1 lb. farmer’s cheese, 1 egg and sugar to suit your tastes (¼ – ½ cup). I also have not made pierogies with whole wheat flour, but you can usually substitute up to half of the quantity of all purpose flour with whole wheat in most recipes.
We love purogees with balsamic vinegar sauce. This is a wonderful easy recipe. Thank you.
I am Polish and grew up eating my grandmother’s pierogi. No need to boil them, actually. I just take fresh ones, put them in a fry pan with melted butter, and fry until they are a golden brown. Delicious! (I like potato and cheese, plain cheese, and cabbage. Apple pierogi make a great dessert!)
Meredith, my tip is to roll out your dough and use a water glass and cut out the rounds… let it sit for awhile fill the center with your choice of filling, fold and thump around the edges or use a fork to close them.
I love, love, love these. My Ukrainian Gram made these for us as youngsters and my father taught me. The only difference is he used eggs. A hint for sealing – (my hubby came along years later and threw this idea at me, he is sooo smart ;)) ; after sealing with fingers – use the tines of a fork…. flip over and do each side along the sealed edge, has worked like a charm for me and avoided mine from bursting open.
My family also loves them made with prunes, my favorite!
I making perogies tomorrow night (for Christmas) and I was just wondering after they’re filled and pinched should I just freeze them or do I boil and then freeze them?
Hi Michelle. Freeze them BEFORE boiling. Then, when you’re ready to prepare them, pop them into lots of boiling water and add a few minutes to the cooking time. You want lots of water because the frozen pierogies will cool the water quickly.
ML
Thank you so much! Greatly appreciated
Delicious and easy! Teenage grandsons made first time and the next time we made 95 of them! Best recipe ever!
Can you make pierogis with bisquick?
I have never made pierogis with bisquick and I don’t think it is a good substitute. It contains baking powder, salt, sugar, and some sort of vegetable shortening, so it would really change the recipe completely. It’s probably just easier to make it with flour as the recipe is written.
Fantastic recipe, easy to make, tastes great! My grandsons and I made 90 day and shared with the family. Better than any store bought!
Love this recipe! Pierogies look perfect for a fun dinner.
We always had prunes as well first Christmas. Any help making a prunes filling would be appreciated. Thanks
Absolutely delicious and so easy to make. I had given up on them as store bought are seriously disappointing. Thank you so much, these will always be in my freezer!!!!
Absolutely delicious and so easy to make!! I made mine completely dairy free because I can’t have dairy and they still taste amazing! Thank you for this recipe 😊