Roasted Cherry Tomato Focaccia

Roasted Cherry Tomato Focaccia is as pretty as it is delicious. Serve it alone, with an olive oil dip or as the bread in a sandwich.

Jump to Recipe (or scroll for photos and riveting information...)
Advertisement - Continue Below
Roasted Cherry Tomato Focaccia bread in a baking pan on a cooling rack with a red and white striped towel.

What is Focaccia?

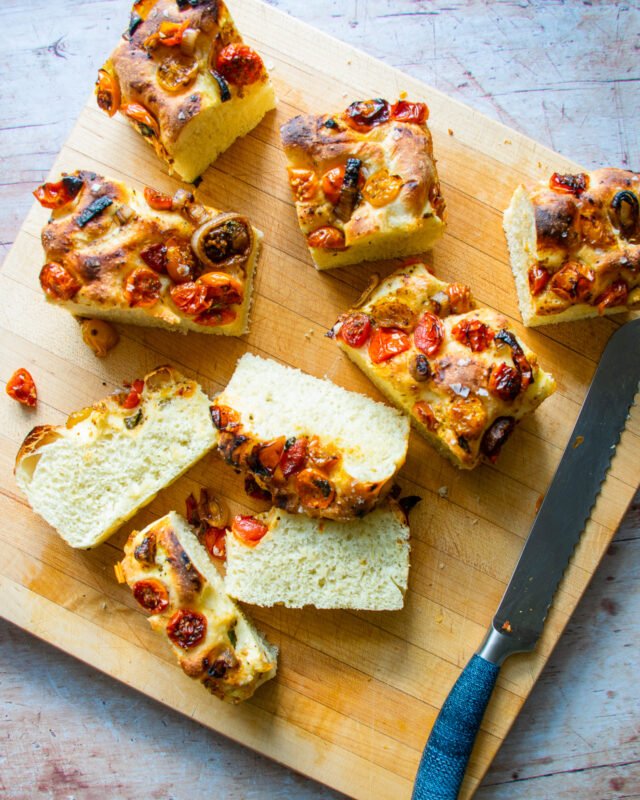
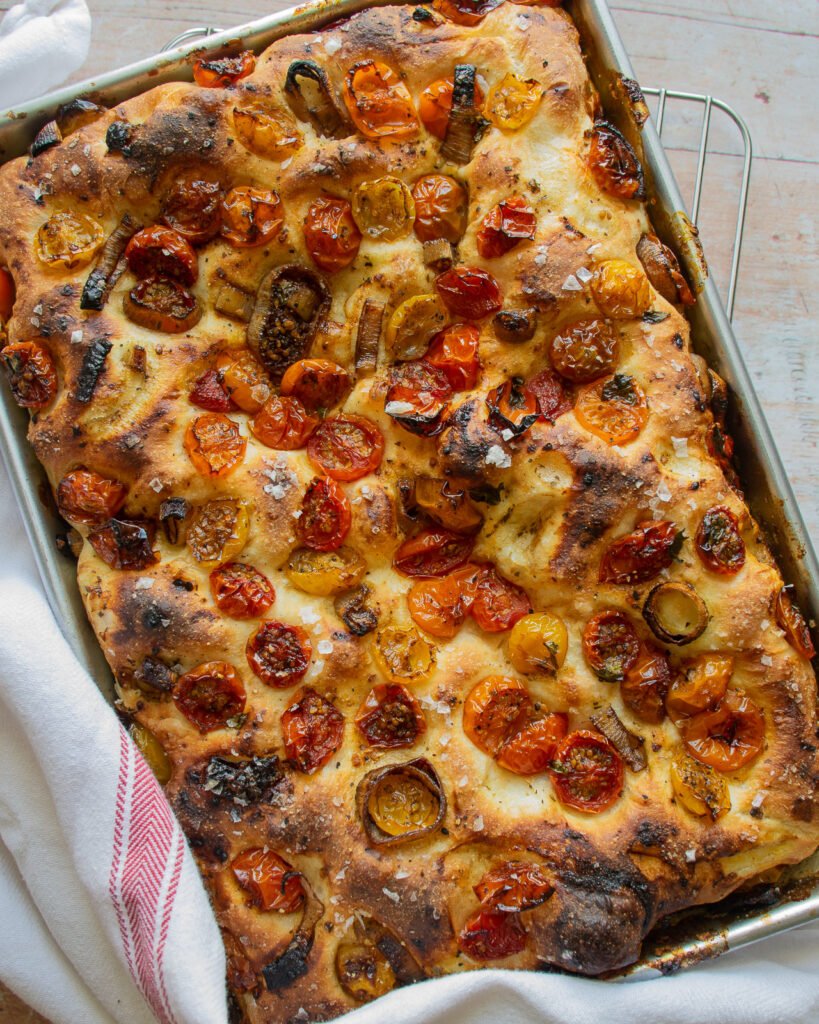
When it comes to bread, focaccia is one of the best. It’s a flat, Italian yeast bread that is somewhat similar to pizza dough, with a soft texture inside and a more crisp exterior. It can be plain, baked with rosemary or topped with vegetables like this roasted cherry tomato focaccia. It can be served alone with some olive oil to dip into, or sliced and used for a sandwich. If I’m sitting at a restaurant and a bread basket arrives, the focaccia will always be the first thing I’m drawn to. In San Francisco, I used to trek down to the North Beach area to buy focaccia from Liguria Bakery – the famous family-run bakery that has been making only focaccia for over 100 years, and worth travel of any distance. Focaccia is special and it’s also a lot of fun to make at home.

Two white ramekins, one with instant yeast and one with active dry yeast.

Instant vs Active Dry Yeast

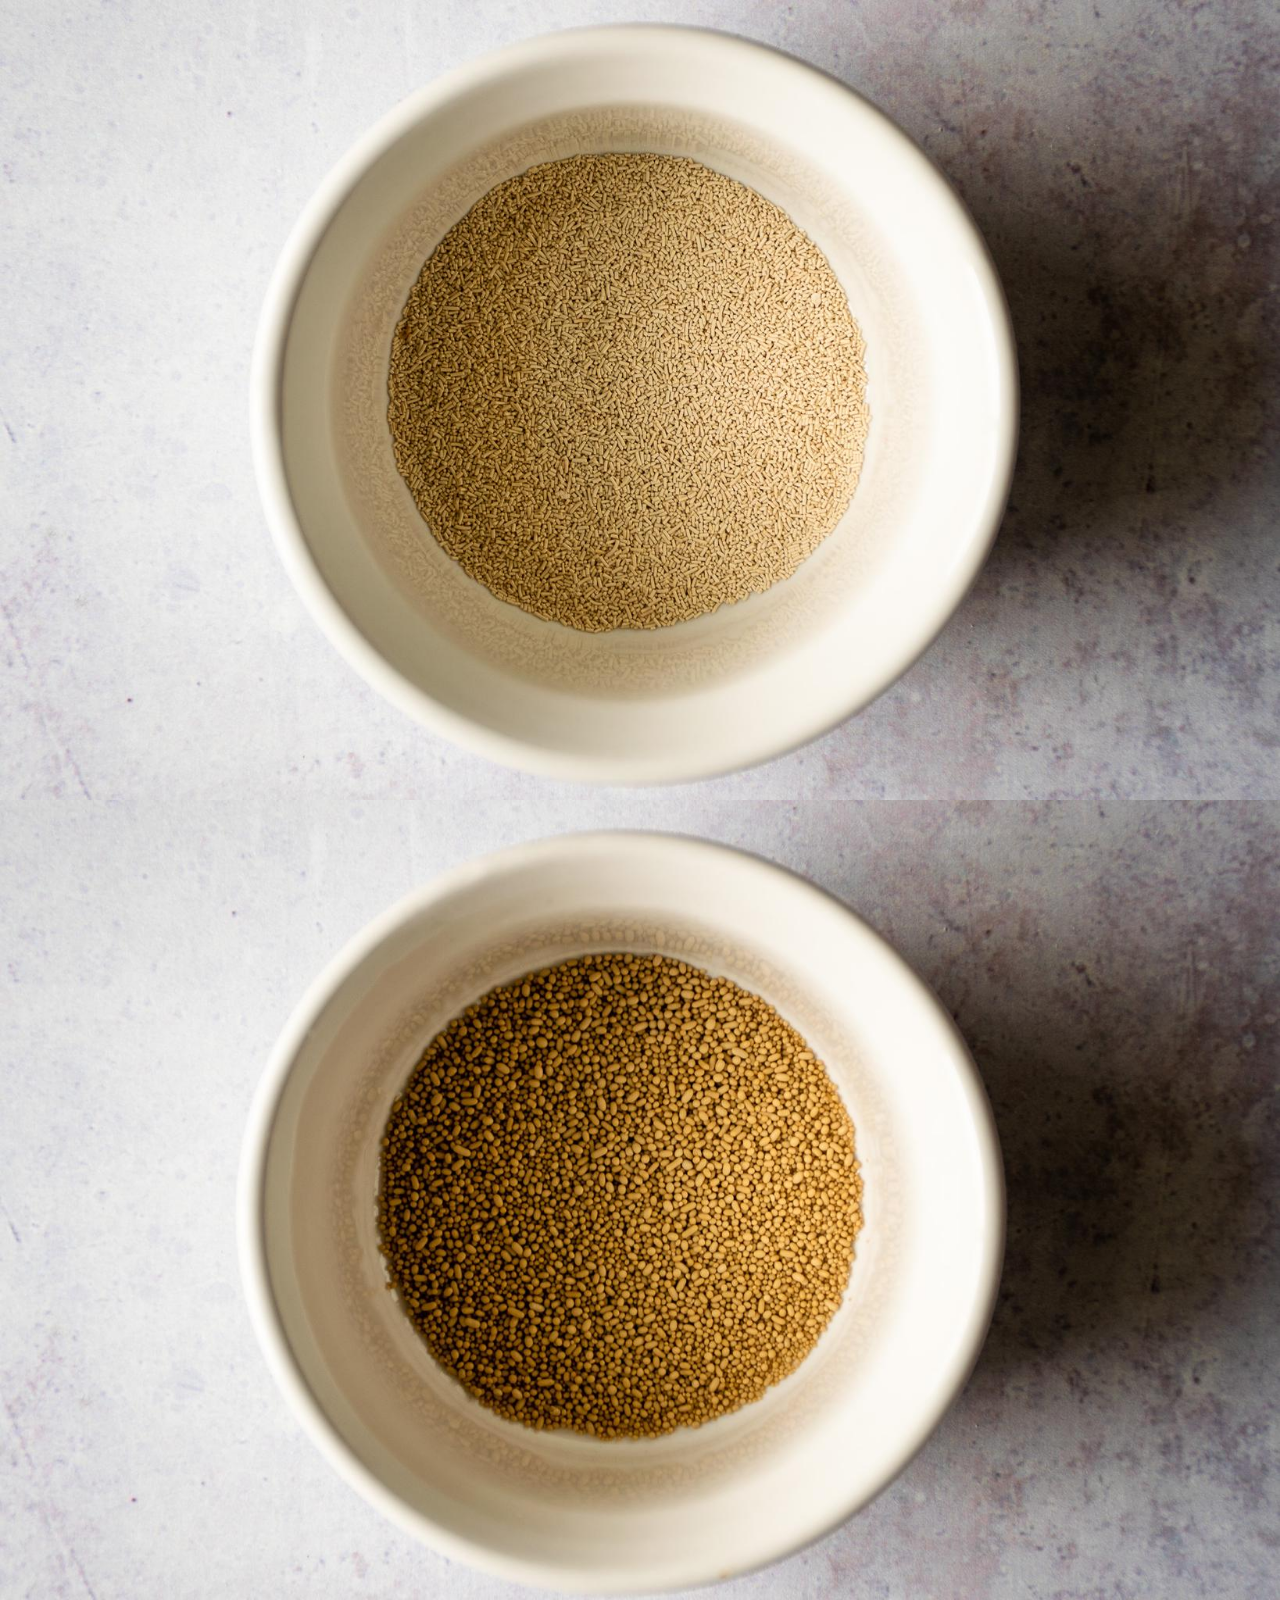
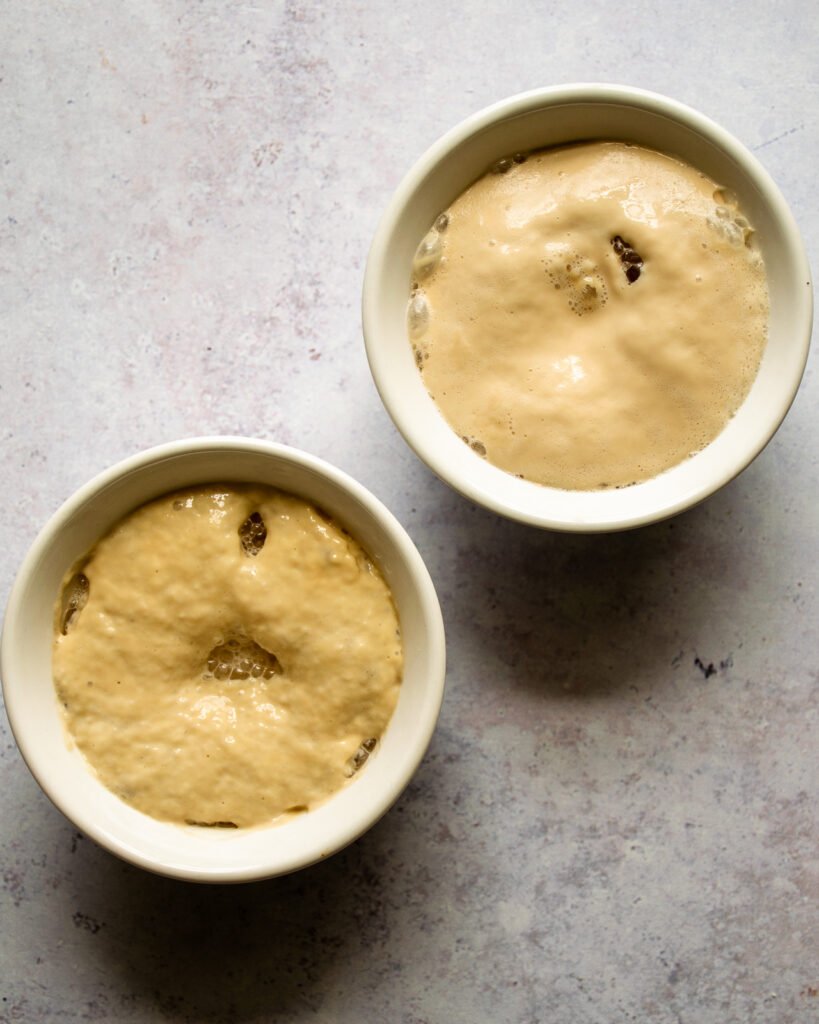
First things first. Focaccia starts with yeast. There are several different varieties of yeast on the market these days, and they can cause some confusion, so let’s clear that up first. The two main yeast varieties you will find are active dry yeast and instant yeast. Active dry yeast (pictured on the bottom in the photo above) needs to be dissolved in lukewarm water before being added to dry ingredients. Instant yeast (pictured on top in the photo above) is milled into smaller particles and can be added directly to the dry ingredients. Instant yeast is also sometimes called rapid-rise and because it activates faster than the more coarse active dry yeast, rising times are quicker.

The good news is that you can use either yeast for this recipe. If you were making large commercial quantities of something, you would need to adjust the amount of yeast depending on which you are using, but when making a smaller quantity, just use a 1:1 ratio. If you are using active dry yeast, however, just know that it might take a little longer to rise.

Advertisement - Continue Below
Two dishes of yeast proofing on a counter top.

Proofing Yeast

Regardless of which yeast you use, however, it is important to know that your yeast is still active before you start. To do that, you need to proof the yeast by mixing it in a little lukewarm water with a little sugar. It takes 10 to 15 minutes, but the yeast should froth as in the photos above (instant on top and active dry yeast on the bottom in the photo above). This is a sign that the yeast is active and ready to go. If it doesn’t froth, you should start with new yeast and be thankful that you didn’t waste your time and ingredients by skipping the proofing step!

[md-recipe-ad]

Focaccia dough ball on a counter with a bench scraper and a baking sheet of cherry tomatoes.

Focaccia Dough

I love making doughs – I truly do. I think they are magical and beautiful as they come together and change as you knead them. This recipe offers you a choice of using all-purpose or bread flour and gives a range of 5 to 5Β½ cups. I always use bread flour when I’m making breads, but you might only have all-purpose flour on hand. The difference between the two will really come down to how much flour you add. Because bread flour absorbs more liquid than all-purpose flour, you won’t need to add as much to the dough to get it to the right consistency. That right consistency is really something that you get used to. You always want to start by adding as little flour as you can and then add enough flour to get the dough to a stage where you can handle it without it sticking too much to your hands. If you’re using a stand mixer, a dough of the right consistency will clean the bowl for you – the dough will form a ball and the bowl will be relatively free from flour. You’ll know when you’ve kneaded the dough enough because it will feel like a horse’s nose (soft and smooth) and you should be able to stretch a small part of the dough out without it tearing.

Advertisement - Continue Below
Roasted Cherry Tomatoes on a baking sheet with an oven mitt.

Roasted Cherry Tomatoes

This roasted cherry tomato focaccia takes regular focaccia and tops it with beautiful and flavorful tomatoes that have been roasted in an herby balsamic dressing. These tomatoes are so sweet and delicious – perfect with soft tender focaccia, but delicious tossed in pasta or on a crostini too.Β  You could use all red cherry tomatoes or a mix of colors. Either will brighten up this focaccia and give it a burst of flavor on top.

Advertisement - Continue Below
Raw focaccia dough in a 9x13 pan.

Focaccia Dimples

One of the distinguishing features of focaccia are the dimples on top. These dimples are made with your fingertips and the dough rises around them as it bakes. These dimples also make perfect pockets for the roasted cherry tomatoes and any olive oil that you drizzle on top.

Advertisement - Continue Below
Unbaked roasted cherry tomato focaccia in a baking pan.

Topping Focaccia

Roasted cherry tomato focaccia is obviously topped with roasted cherry tomatoes, but you could vary the topping. You could keep it simple with just some olive oil, garlic and rosemary, or you could add sliced olives. Even some julienned salami and cheese would work nicely. Just make sure whatever you put on top won’t burn. Be ready to cover it with some aluminum foil if it starts to get too dark.Β 

Advertisement - Continue Below
Roasted cherry tomato focaccia bread on a cutting board cut into pieces.

How to Serve Focaccia

Once you have your beautiful tray of focaccia, you have to decide how you will slice and serve it. You could cut it into small squares and enjoy it on its own or as a side with some pasta. Or, you could cut big squares, slice them in half horizontally and use them to make a sandwich (shaved ham is particularly nice!). Or you could cut it into strips and serve it with olive oil to dip into. If you want to make a simple but delicious herbed olive oil dip, add β…“ cup extra virgin olive oil with 1 tablespoon each of fresh parsley, fresh oregano and fresh basil, a pinch of crushed red pepper flakes, 1 tablespoon of grated Parmesan cheese and some freshly ground black pepper. Delicioso!

Roasted Cherry Tomato Focaccia Bread

  • Prep Time: 30 m
  • Cook Time: 30 m
  • Rising Time: 2 h 30 m
  • Total Time: 3 h 30 m
  • Servings:
    8
    to 12 people

Ingredients

Focaccia Dough:
  • 2 cups warm water 90Β°F, divided
  • 2ΒΌ teaspoons active or instant dry yeast
  • 2 tablespoons sugar
  • 2 tablespoons olive oil
  • 2 teaspoons salt
  • 5 to 5Β½ cups all-purpose or bread flour
Roasted Balsamic Cherry Tomatoes:
  • 1 pint cherry tomatoes
  • 3 shallots sliced
  • 1 to 2 cloves garlic thinly sliced (optional)
  • 2 tablespoons olive oil
  • 1 tablespoon balsamic vinegar
  • Β½ teaspoon dried oregano
  • 6 fresh basil leaves
  • salt and freshly ground black pepper

Instructions

  1. Start by making the focaccia dough. To make sure your yeast is active, combine 1 cup of the lukewarm water, yeast and sugar in a large bowl or in the bowl of a stand mixer. Let it proof for 10 to 15 minutes. It should froth a little. If it doesn’t froth, your yeast is not active and you should start again with new yeast.
  2. Add the remaining water, olive oil, salt and 5 cups of flour to the yeast mixture. Mix with a wooden spoon or the hook attachment of the mixer until the dough comes together to form a sticky ball. Add additional flour to get the right consistency. If you are using a stand mixer, the dough should pull away from the bowl, leaving it mostly clean. If you are kneading by hand, you should be able to handle it, but it will be soft and a little sticky. If you are using all-purpose flour, you will need to add more than if you are using bread flour, but you shouldn’t need more than 5Β½ cups total. Knead the dough for 10 minutes until it is elastic and smooth.
  3. Place the ball of dough in an oiled bowl, turning the dough over to coat with oil. Cover the bowl with plastic wrap or a clean kitchen towel and let it rise in a warm place for 1 hour until it doubles in size.
  4. While the dough is rising, roast the cherry tomatoes. Pre-heat the oven to 400Β°F. Cut the cherry tomatoes in half and toss them with the shallots, garlic, olive oil, balsamic vinegar, oregano, salt and freshly ground black pepper in a large bowl. Stir in the fresh basil leaves, tearing any large leaves in half. Place the tomatoes onto a baking sheet in one layer and transfer the sheet to the oven. Roast for 10 t0 15 minutes, until the tomatoes just start to soften and collapse.
  5. Coat a 9-inch x 13-inch pan with olive oil. Once the dough has doubled in bulk, transfer it to the pan. Press and spread the dough out into the pan and flip it over to coat both sides with the olive oil. Using your fingertips, press the dough to form dimples. Cover the dough with a clean kitchen towel and let it rise for 30 minutes.
  6. Spread the roasted tomatoes out over top the dough pressing them gently into the dough, making more dimples in the dough with your fingers. Sprinkle coarse salt on top, cover with the towel again and let the dough rise for another 30 to 40 minutes. The dough should rise to fill three quarters of the pan.
  7. Pre-heat the oven to 425Β°F.
  8. Transfer the pan to the oven and bake the focaccia for 25 to 30 minutes, until the bread is golden brown on both sides. Transfer the pan to a baking rack to cool for 10 minutes. Then remove the focaccia from pan.
  9. Cut the focaccia into squares, rectangles or strips. Serve with an olive oil to dip into or use the focaccia to make sandwiches.
Advertisement - Continue Below

Comments (19)Post a Reply

  1. 5 stars
    Thank you so much for the Focaccia Bread recipe. As soon as I get more tomatoes, I will be making it! (Tomatoes are on the plant, they just need to get red!!)

  2. 5 stars
    I made this today and it was absolutely delicious! The recipe is easy to follow and turned out perfectly. This was a great use for the bounty of cherry and grape tomatoes from my garden. Thanks for an outstanding and well-written recipe-I definitely will make this one again.

  3. 5 stars
    I made this today, since I was motivated to use up a supply of cherry tomatoes. It was excellent (my husband said it’s restaurant quality!). Thanks for the step by step instructions with photos and tips, I used a Tuscan herb flavored olive oil for the dough and I think that added a bit of extra flavor. I’m looking forward to trying different variations of the recipe (kalamata olives are next!) this fall and winter.

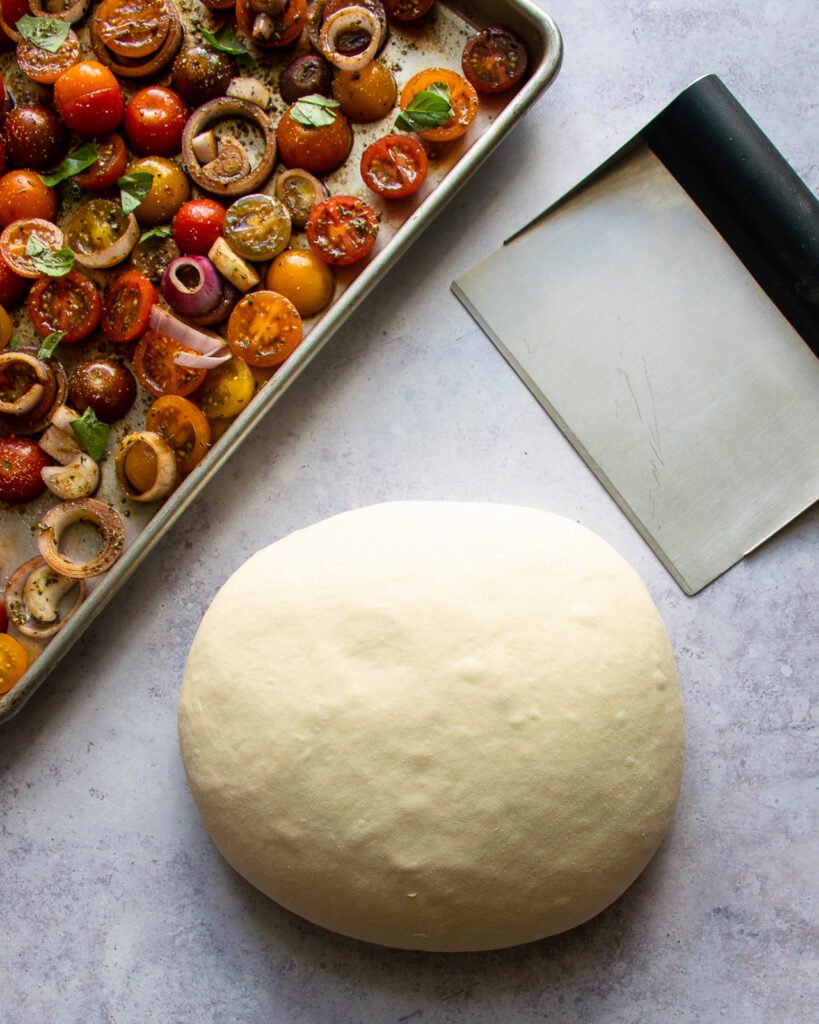
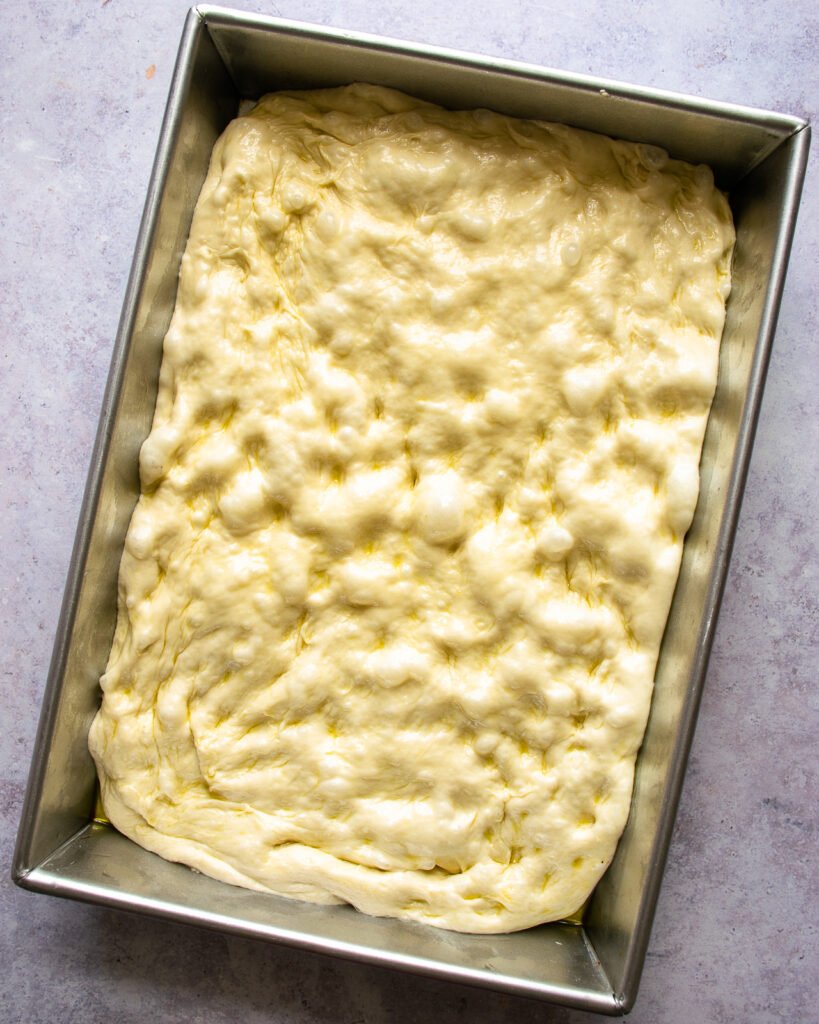
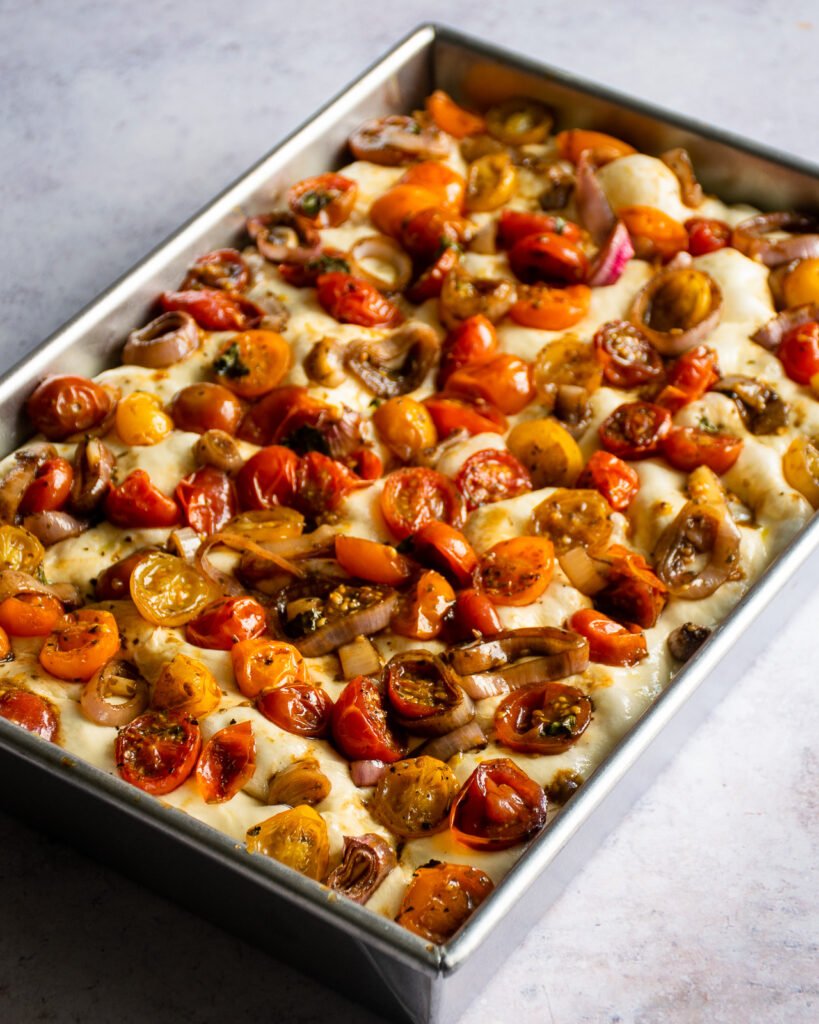
  4. To play it safe, I took advantage of the oven temperature. I preheated the oven to 400 degrees F and roasted sliced cherry and grape tomatoes. They were finished in just shy of 30-minutes. After that I cranked up the oven to 450 degrees F in anticipation of baking the focaccia. I stretched the dough into a 13 x 9 sheet pan. And gave it a little time for a quick second rise. Then I called in for help. My five-year-old loves focaccia, so I had him press his fingers into the top to create lots of dimples. Then I tucked in the tomatoes, cut side up. It didn t take long for the kitchen to fill with the most wonderful, welcoming aroma that is one of the joys of bread from scratch.

  5. 5 stars
    Made this for NewYears Eve, loved it! My husband wants me to make it all the time now. He said no more baguettes from grocery store πŸ₯°

  6. Love this bread!
    Question…..can I use frozen cherry tomatoes….can I roast frozen cheery tomatoes and if so for how long!
    Enjoy you!

    1. Hi CJ. Hmm.. The issue will be the moisture content. There will be a lot of liquid emitted from the frozen cherry tomatoes. That will need to evaporate before the tomatoes and roast and caramelize at all, so just extend the time in the oven. You might also let the cherry tomatoes thaw in a colander and let the excess water drain away. You can definitely give it a try. If they end up too wet for the focaccia, they’d still be great over pasta.

  7. 5 stars
    Delicious! I made it for a dinner party for the first time (yes, a bit risky) but it worked perfectly and was just yummy. The roasted tomatoes were so fragrant – my whole cottage smelled delicious. Thanks!

  8. Made this yesterday. Did a combo of roasted cherry tomatoes and sun-dried tomatoes on top. This recipe was great. So nice and fluffy. Might make it again!

  9. I love your recipes! But I have to write them because it is just too difficult to follow with the tablet. Do you have a cook book with your recipes? I have your pressure cooker and your book for pressure cooking. And I love your recipe for cheese cake. I’m 84 years old but still love making new recipes as well as the old ones.

    1. Meredith has written 8 cookbooks but not all of the recipes on the website are in her cookbooks. There is a printer version for each recipe that you could possibly print out when you are making a recipe if following on the tablet isn’t working for you. Check out the cookbook in Meredith’s shop on the website: https://bluejeanchef.com/shop/

  10. 5 stars
    This recipe is so amazing! The bread comes out perfect every time and the tomatoes add an acidic touch that perfectly compliments the rich taste of olive oil!

  11. This recipe is easy to do, and delicious to eat!

    I want to make it for houseguests I need to pick up from the airport. Wondering the best timing to put the recipe on hold; after the 1st rise? After the 2nd rise before putting the tomato mixture on top? Or, after the tomatoes are added? Should it be refrigerated when paused? Any special tricks I need to know? It’s going to be about 90 minutes of wait time. Thank you!

    1. Hi Karen. You have a couple of options: 1) make the entire focaccia ahead of time that day and re-heat it in the oven when your guests are there for about 10 – 15 minutes. 2) Make the dough through step 5 and then refrigerate in the baking pan instead of letting it sit for 30 minutes. You can even do this the day before. Then, take the dough out and leave it on the counter while you go to pick up your guests. When you are home (after 90 minutes, pop the tomatoes on and let it rise for another 30 before baking and proceeding with the recipe. Good luck!

  12. I made this! It is amazing and I highly recommend it! Perfect way to use all of those cherry tomatoes the garden keeps producing πŸ˜›

Leave a Reply

Your email address will not be published. Required fields are marked *