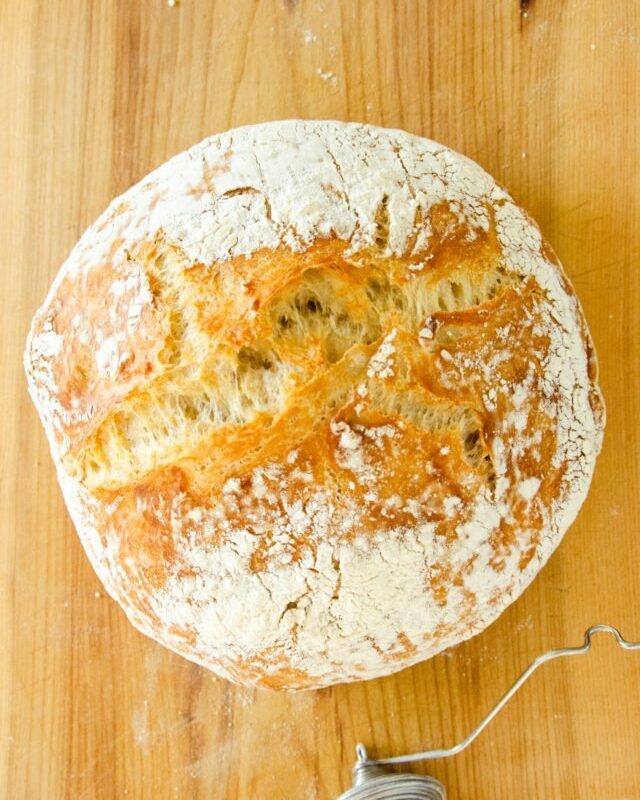
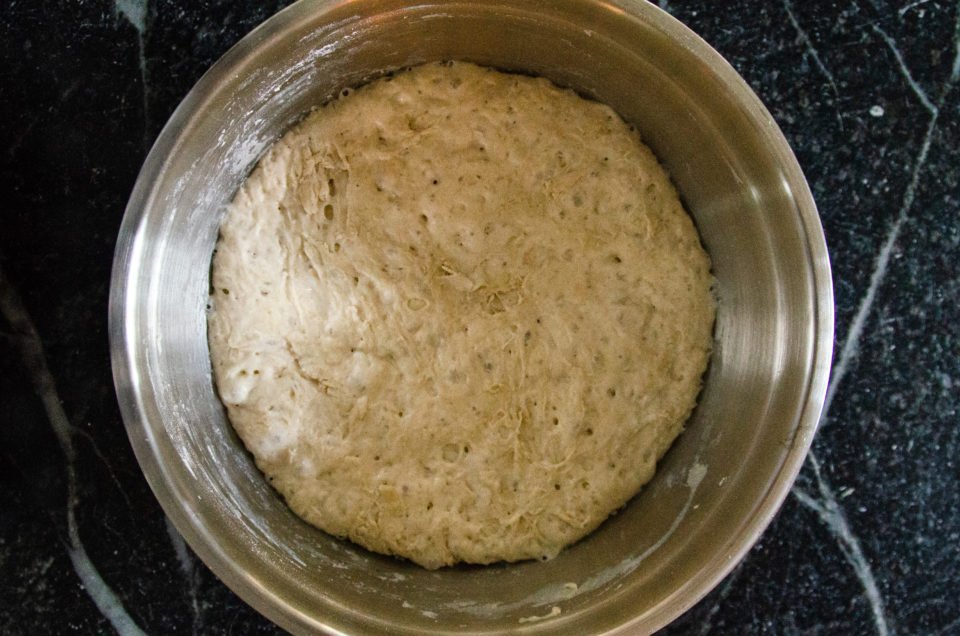
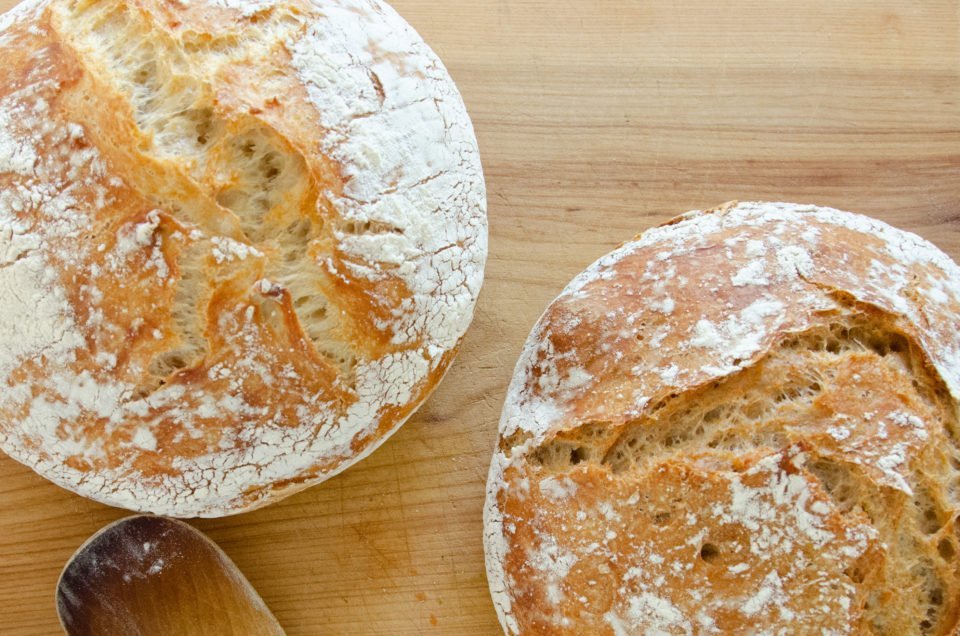
It’s frustrating to think that for years we believed that bread that looked this good was something you’d find only in an artisanal bakery, and definitely not something you could make at home, let alone by someone with only a 5-minute attention span. And yet, there it is – simplicity sitting right under our noses. No need for kneading.
Jim Lahey, the owner and baker of Sullivan Street Bakery, produces breads for over 300 restaurants in New York and in 2006 the New York Times first published Jim’s method of making bread without kneading it – No Knead Bread. This went against centuries of tradition where kneading the bread dough was deemed critical to developing the gluten in flour, which in turn was necessary to create a bread that would rise beautifully and hold its shape while having the loose airy crumb of artisan bread loaves. Jim figured out that a slow rise of a relatively wet dough created a more flavorful loaf – similar to those loaves he had eaten in Italy – and that the extra moisture in the dough would evaporate into steam in the oven, helping the dough to rise and the crust to crisp.
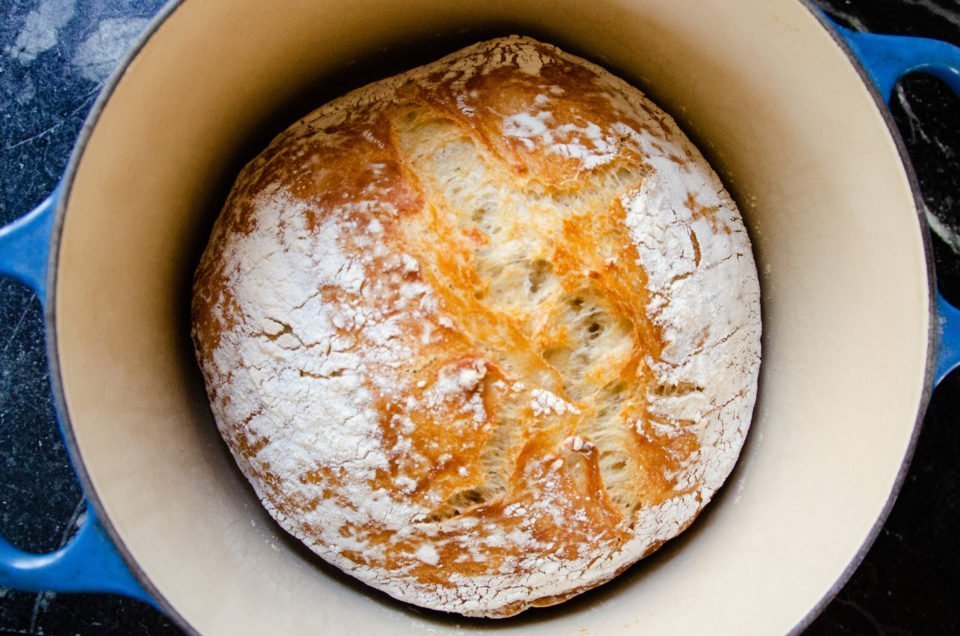
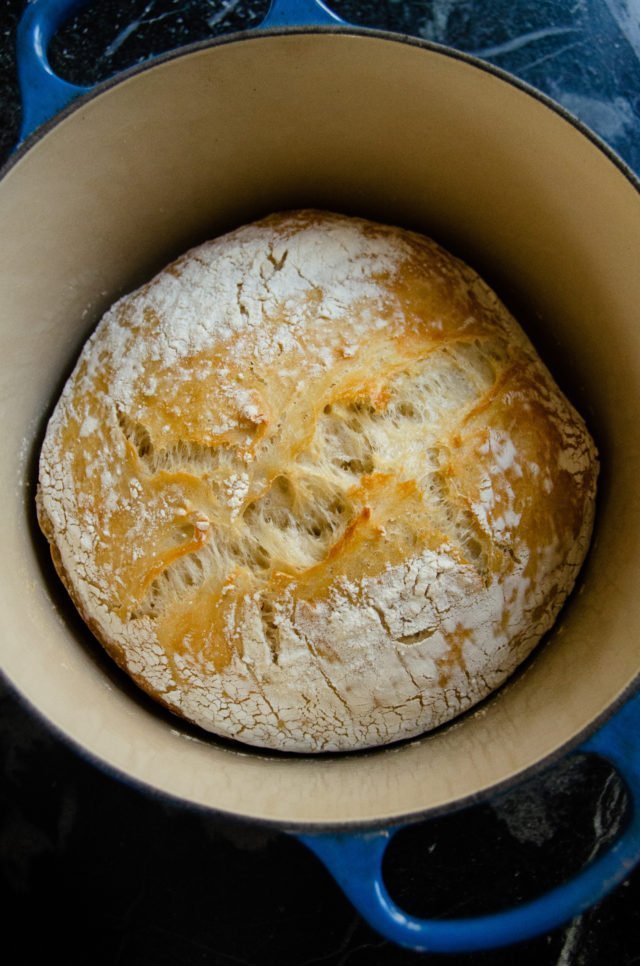
The no knead bread is baked in a cast iron Dutch oven which is pre-heated for 30 minutes along with the oven to 425ºF. The cast iron holds the high heat of the oven and turns into an oven in and of itself – an oven in an oven, so to speak. Topping the Dutch oven with a lid allows the baker to trap that steam being released by the bread and helps with the rise – a more intense bake than just baking in an oven on a stone.
Of course, this is the only tricky part of the recipe – getting the bread into the smoking hot cast iron Dutch oven without burning yourself or deflating the dough too much. One trick is to use the parchment paper that the bread is resting on as a transfer mechanism, placing it into the cast iron pot along with the bread dough. The downside of this trick is that I’ve found that the paper traps a little moisture on the bottom of the loaf, which ends up less crusty, but you can always crisp the bottom of the loaf back up in the oven after it has baked.
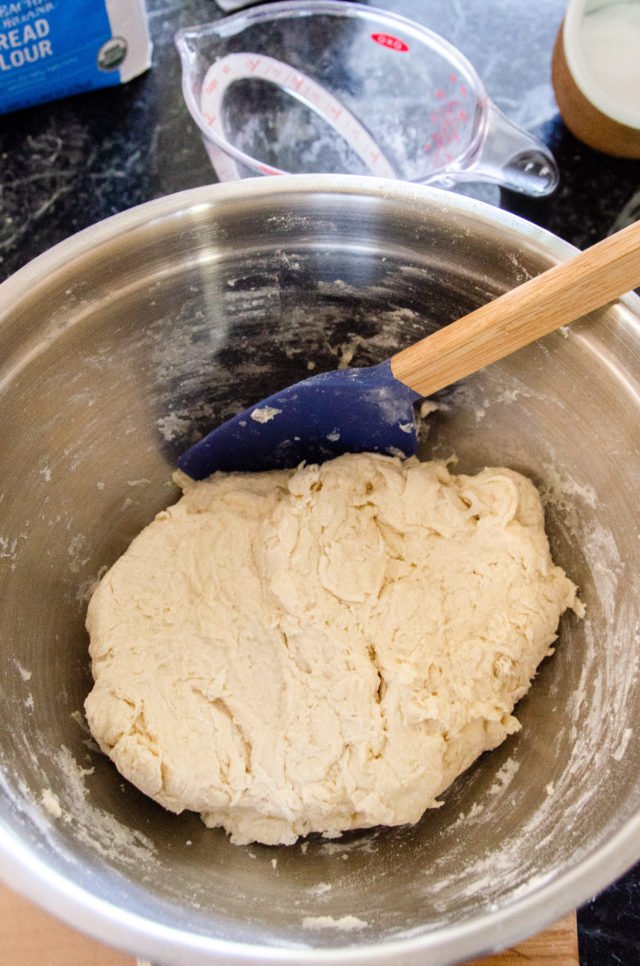
The other challenge to the recipe is handling the dough when it is so wet and sticky. The answer here is a little counter-intuitive – you want wet hands. Before you turn the dough out onto a well-floured surface, wet your hands so that the dough can’t stick to you. It works every time.
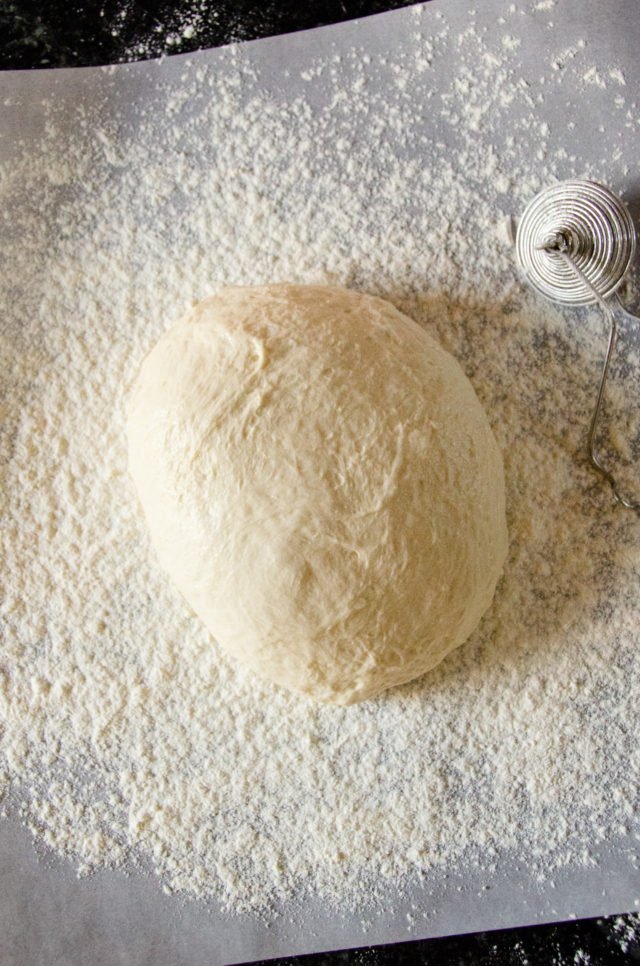
Finally, be sure to flour the surfaces of the bread well. Really well. I use a flour duster for this, which gives me an even coating of flour. The flour helps make the transfer of the dough from countertop to cast iron much easier and it creates a pretty pattern on top of the loaf. You can’t really avoid getting flour on your countertops (or floor.. or face for that matter) with this recipe, so just let it happen and clean it up later. Besides, what excellent artisanal bakery doesn’t have flour on the flour and counters?
If you like this white version of Jim Lahey’s No Knead Bread, try my whole wheat version here.


Hi Meredith,
I think I missed something in the recipe for the NO Knead Bread. What size dutch oven does one use in this recipe?
Looking forward to watching another evening class. Thank you!
Hi Karen,
I use a 5 to 6 quart Dutch oven. You could use a 4 quart instead – it will be a little tighter to get the bread into the pot, but it will have a higher rise. Anything bigger than 6 quarts will allow the bread to spread out a little too much – still delicious, but not as high a loaf.
Hi Meredith
Can another type of vessel be used,I don’t have a cast iron Dutch oven..have cooks essentials no stick pot set
Hi Cathy. Cast iron is the best sort of pan for this bread because it holds the heat so well and turns into an oven inside your oven. If you don’t have cast iron, give it a try with a regular pot, but your pot will need to be oven safe to 425ºF.
What can be used instead if a cast iron Dutch oven which I don’t have.😁
Hi Cathy. Cast iron is the best pot to use because it holds onto the heat and turns into a mini oven inside your oven. If you don’t have cast iron, use the heaviest pan you have that is oven-safe to 425 degrees F.
Could this bread be made with less or no salt (I know taste will change 😕) but I am on a low sodium diet. Will it change it way is rises. Thanks
Hi Jackie. Salt actually inhibits yeast, so leaving it out will not affect its rise. You’re right – it will affect the flavor however.
Two Hints – I fold aluminum foil into a square and place in bottom of the Dutch Oven – Several layers thick – Makes the bottom of the bread less hard while baking. Also – Cut a A Square of parchment paper – wider than the base of the dough – Spray with Pam – Place the dough on top and use as a Sling to place the dough into the hot pan AND Makes for easy removal when bread is baked.
Meredith,
thank you for also making a video for the no-kneed bread ,I am going to try to make this loaf for the up & coming thanks giving dinner . I think im going to make a test batch ahead of time to get my nerves out of the picture thanks again 🙂
Meredith, I plan to make both versions of the No-Knead Bread but need to make a 2-pound loaf. When I double the recipe, what size Dutch oven would be best? I have several sizes.
Would there be any changes in the fermentation and proofing times?
Hi Rita. The fermentation and proofing times should stay the same. You could make it in a 6 quart Dutch oven I think, with no trouble.
ML
I have made this recipe twice now and I love the taste and texture but I have too much moisture in the dough. I weighed out the bread flour which I always do but even after using a heavily flour surface it still is extremely difficult to transfer to my cast iron pot. It’s just a flat blob. My question is should I use more flour in the recipe or less water? Thank you!!
Hi Gail,
You CAN add more flour OR less water to the recipe if it seems too sticky to you. All flours are a bit different depending on where they are from and volume water measurements can vary too, so bread-making does need a little flexibility. You’ll get used to how much water and flour to add. However, this dough is not super thick. It can be a relatively flat blob. Transferring it to the hot pan is the hardest part. If it’s really difficult, let it do it’s last rise on parchment paper and then just lift the parchment paper and put it in the pot with the dough.
ML
Yep. I did it, at 57 I made my first loaf of bread. This recipe was so easy. Thanks Meredith
Yay you! 🙂
ML
Hi Meredith!
So I tried to make this bread and for some reason the bread keeps coming out dense. Am I doing something wrong? I’ve measured the exact amounts listed? The outside is beautiful but the inside is dense and not very light or airy
Thank you
Hi Tam. Have you checked your yeast? Is the dough rising before you bake it? That would be my guess. Test your yeast in a little warmish water with a little sugar. It should foam in about 5 to 10 minutes. If it doesn’t, the yeast is dead and the only thing you can do is buy a fresh pack or jar.
I added 1/2tsp of sugar turned out great!!!!!very easy to make
Made this and the whole wheat version several times now – needs more flour. Haven’t figured out yet how much. With the current version, it’s more like a sponge than a dough. Thanks – trying to add seeds to it to make it even more artisan.
I’m using a 12″ old style dutch oven – the crust is unbelievable.
Can I use all purpose flour instead of bread flour? I want to also add walnuts and cranberries.
Hi Janet. Yes, you can use AP flour instead if that is what you have. The crumb will be a little different. If you want to add walnuts and cranberries – go for it!
If I want to add seeds, do I just add it when I’m mixing the yeast/flour/salt and sugar or wait until after the 12-18 hours mark? Thank you.
Hi Rita. It will be easier to add the seeds when you’re doing the initial mixing together. The dough is very wet and soft after the 12-18 hour mark and getting the seeds to distribute evenly would be a challenge.
Hi Meredith,
I want to make this bread and only have Rapid Rise Yeast and Bread Machine Yeast. Will it work with any of those or should I get the regular yeast?
Hi Adel. For this recipe, you could use either active dry yeast or instant (rapid rise) yeast. If you use active, make sure you dissolve the yeast in water first. If you use instant, you can mix it right into the flour as written in the directions.
Can you use regular all purpose flour ??
You can use AP flour in a pinch. The difference is that you might need to use a little less water. Bread flour is high protein and as a result absorbs more water. Leave a couple tablespoons of water out and only add it if you need it.
Is the water supposed to be warm?
Hi Connie. The water should be room temperature-ish. It doesn’t have to be warm because the dough rises very slowly over a long period of time. Having the water around 80ºF, however, does help give the yeast a head start.
Can I use a copper chef pan, don’t have a Dutch oven
Miss you on QVC
Hi there. Yes, you can use the copper chef pan as long as the pan and lid are oven safe to 425ºF.
I absolutely love this bread! It is crusty, dense and delicious! I have made it several times and I need to make it again soon.
I would like to make this bread, however, Ian gluten free. Can I make it with gluten-free flour. I’d love to have a recipe for gluten-free bread since all the gluten-free bread I buy, the slices are quite tiny.
Hi Maxine. I haven’t tried this bread with gluten-free flour, so I’m afraid I don’t have a definitive answer for you, but I have seen that people have made gluten-free no knead bread. Expect it to not rise quite as high and to have a slightly different flavor, but it can be done.
What temperature is the oven heated
Hi Carol. You’ll need to pre-heat the oven for at least 30 minutes at the end of step 4. 425ºF.
Can I use self rising flour for this recipe?
No, I’m afraid not. Self-rising flour includes baking powder and salt. You could use all purpose flour.
Looking forward to making this bread. Think it would work okay if I exchanged the yeast for 1 cup of sour dough starter?
Thank you much
Yes. I think it would be fantastic. You might want to check on how much starter you are going to use, however. Check out this page from King Arthur flour on how to substitute starter for yeast. https://www.kingarthurflour.com/blog/2015/10/29/adding-sourdough-recipe
So good! Thank you for posting! My daughter has 5 food allergies and we can’t find bread in the store she can eat with the virus causing shortages. It turned out perfect on the first try! Appreciate any more recipes that don’t contain dairy, egg, peanut, treenut or sesame.
Just made this & it is spectacular!!! Had to MacGyver my 11 qt copper chef dutch oven, because it was too large. Covered half of the inside with a small metal bowl & put tinfoil around it to make the pot smaller. The bread came out fantastic!!!! LOVE LOVE LOVE!!! Will definitely be making this again!!! As the saying goes, you can make something small in a large pot, but you cannot make something large in a small pot.
Made the bread. Waiting patiently for the 30 minutes to relapse before slathering butter on it! Easiest recipe ever, and smells divine. Thank you, Blue Jean Chef! I love your recipes!
Is this a tough, chewy bread? I’ve found that often with artisan breads I have to chew every bite too long. Also, do you know what makes a bread chewy instead of tender?
Hi Lisa. I wouldn’t call the bread “chewy”, but it’s not like a store-bought sliced white bread loaf. If you want to minimize the “chewiness” of the bread, try using all purpose flour instead of bread flour.
Every time I make this my bottom crust comes out too dark for our taste. Any suggestions please??
Other than that this recipe is delicious indeed. Thank you
Try to make sure the rack you are using is as high as it can go while still allowing the Dutch oven to fit inside the oven.
I just am wondering why you use 425° to bake. The original Jim Lahey recipe is 450°. Also, if I manage to get bread I to pot without parchment, Will it stick to the pot? Thanks.
Hi Carolyn. If you get the bread into the pot without the parchment, it will be fine – it won’t stick. Once it bakes and forms a crust, it should release from the pot perfectly. I used 425ºF in the oven because I found that some of my loaves were getting a little too dark for my liking. It’s all a matter of personal preference. You could absolutely use 450ºF and end up with delicious bread.
Hi Meredith
I live in Sweden and I don’t see anything in the store that indicates its bread flour. What I have found is of course the normal AP flour, but in addition there is a flour called flour special – it says on the package that it is used for all sorts of bread and that it contains more protein that the usual AP. Then the other one was Manitoba Cream (sifted bageri flour) – ideal for bread and that it is based on proteinrich spring wheat. Because of its high protein content the flour has a unik rising power and takes up a lot of fluid which makes the bread light, airy. Rough translations. I am thinking this last one is more like bread flour you have in the US, but would like your opinion.
Thank you for your input
Hi Linda. Bread flour is high protein flour, usually made from winter wheat. The Manitoba Cream is a high protein flour as well. So, short story is both will work. All flours have different protein levels and consequently absorb water differently. You could use any flour for this recipe (including all -purpose) and just adjust the water a little if it seems too dry. I think you’ll be fine with whichever flour you choose, but if you have a choice, I’d go for one of the two bread flours – the “flour special” or the “Manitoba Cream”.
ML
Hi, Meredith! I really want to try this bread – because of COVID-19, dry active yeast is basically non-existent. I can get fresh yeast – what would be the measurement for fresh yeast as opposed to dry yeast? Thanks so much!
Hi Annie. Here are the rules to convert from fresh yeast:
To convert from fresh yeast to active dry yeast, multiply the fresh quantity by 0.4.
To convert from fresh yeast to instant dry yeast, multiply the fresh quantity by 0.33.
TO convert from active dry yeast to fresh yeast, divide the active dry quantity by 0.4.
To convert from instant dry yeast to fresh yeast, divide the instant quantity by 0.33.
Active dry yeast needs to be dissolved in water first, but either instant or active dry can be used in this recipe.
ML
I’m a hesitant baker but this recipe makes me feel like a pro. I don’t want to tell anyone how easy it is!
This bread was delicious and easy.
I made this and it is a winner in our home. It is soft and chewy on the inside and hard crusty on the outside. I followed The instructions and it is perfect. Thank you so much for a delicious bread.
Meredith, I remember buy a similar artisan bread with chopped apples and walnuts. Do you think it would work in this recipe?
Hi Sandra, here is my recipe for Fruit and Nut No Knead Bread that you could follow. You probably want to use dried apples instead of fresh because of the moisture content. https://bluejeanchef.com/recipes/no-knead-fruit-and-nut-bread/
I have made it several times. It’s so good and easy to make. I was afraid with so little salt it might not have good flavor, but it’s perfect. The wet hands is a super tip and works so much better than floured hands would with such a sticky dough
This recipe turned out Amazing! Absolutely the taste and the crunch I had been looking for months. Thank you so much. I tried a dozen recipe before and I was almost losing hope when I tried this one. This will be my only artisan bread recipe. I will try making it in the evening and let it sit for 12 hours and bake it in the morning because with butter it will be make my day. As soon as the bread warmed up, I sliced it and put some of it into the freezer. The bread was soft even days after. I cannot express my appreciation and gratitude enough because I am a bread lover:)
This is similar to a no-knead recipe I’ve been using for years but uses AP flour and beer. Tried your version but added 1-1/2 cups freshly grated parm, about a tsp dried dill and 2/3 cuos sun-dried tomatoes. My other recipe called for starting covered in a cold oven. I followed your instructions to preheat dutch oven first. Also used my usual method of using parchment for lifting in and out of vessel. No longer have my 6qt so used a 3.5qt. The rise was higher which I preferred and smaller. Turned out beautifully. I will next make a seeded rye bread.
The printed recipe says “instant yeast” but in the comments section you say regular. I don’t use instant yeast so am glad I scrolled thru the comments! Now I can make this!
Hi there. There are different types of yeast out there – fresh, instant, active, quick-acting… Most of the time I use Instant yeast. It is very similar to active dry yeast, except that it doesn’t need to be mixed with liquid first. Active yeast needs to be added to liquid and then that liquid added to the dry ingredients. You can substitute each for the other in a 1:1 ration unless you are doing big quantities. In that case, you should add 1.25 teaspoons of active dry yeast for every 1 teaspoon of instant yeast. For this recipe, however, a 1:1 ratio is fine.
Are you using regular table salt or kosher salt? Thanks!
Hi Laurie. I always use kosher salt.
ML
Great tasting, however for the second time didn’t get the rise I was expecting. Dough may have been too wet when starting? More yeast?
Definitely will make again!! Next up your sourdough recipe!
Hi Robert. I would check your yeast to make sure it is active. The dough is pretty wet, but you can always add a little more flour if you have trouble handling it. Make sure your oven and pot is well pre-heated. That burst of heat is what really helps with the rise.
Made this today, this is the first time for me making sourdough bread, it turned out perfect, I will be making more and adding some Rosemary. Thanks for doing the video, I enjoyed it.
A Question first before making this: The written recipe says 1/2 teaspoon INSTANT yeast, but somewhere in the comments you said it has to be regular yeast. To me, rapid rise & instant are the same. Please confirm you meant active dry. Thanks.
Hi there. I have used both active dry yeast (needs to be mixed with water first) and instant yeast (yes, sometimes marketed as rapid-rise and does NOT need to be mixed with water first) in this recipe, but the recipe directions are written for Instant yeast. Sorry for the confusion and lack of clarity.
I love this no knead recipe and bake it all the time!!
Hi, Meredith!
I just made the No-knead bread. It is resting now and I can’t wait to try it! House smells WONDERFUL! I erred in that I grabbed wax paper instead of parchment; but no worries. I just had to take extra care before inserting into pot! Wish I’d made it yesterday as I made your magnificent Rigatoni in the Pressure cooker last night for dinner! Thanks for all of the FANTASTIC recipes!!
Hi Meredith,
I really enjoy making this bread recipe and it is delicious. Thank you.
My question is; Is it possible to double the recipe and store the second dough
in the freezer or refrigerator to bake later ?
Hi Karen. You could make a double batch and then when you split it in two before the final shape and rise, put the second dough into the fridge or freezer. You will have to let a frozen dough defrost completely, let the refrigerated dough come to room temp before shaping and leaving for at least 30 minutes.
I have made this bread several times and find that it lacks flavor. Can I add some sugar dan a little butter in it?
Hi Danielle. If you find it lacks flavor, then you might want to change up your flour. Try a stone-milled flour from a local mill and you’ll be amazed at the flavor. I would also up the salt a little if. Of course you can add sugar and butter if you want to as well, but the flour and salt would be the first place I’d start.
So easy and so good!
First time I made this bread it came out perfectly. Second and third time I let rise in oven with light on. Dough was sooo sticky I couldn’t do anything with it? Could my oven be too warm with light on?
Hi Toni. I doubt the oven light would make the oven too warm. I expect what might have happened is just a slight inconsistency with measuring. When we measure with volume measures, we can never be exact and consistent time and again. So, when using volume measures, be ready to flex with water and flour, adding water if the dough feels too dry and adding flour if it feels too wet.
We’ve made this several times. We play with ingredients … almost always adding ground flax seed. Lately we’ve added crushed rosemary to the flour and olive oil and fresh rosemary to the top before baking … delicious.
Next we’re going to add everything bagel spice to the top.
Also did sesame seeds.
Plain is awesome too though.
Meredith, I have a 3 qt dutch oven, can I just half the recipe for my oven? It’s only me and I would love to try this recipe.
Sure you could make a smaller loaf of bread by cutting the ingredients in half and baking it in your 3qt. Dutch oven.
What size dutch oven do you use
You can use a 5 or 6-quart cast iron Dutch oven for this bread.
Can I bake a sourdough loaf this way?
Hi Dawnine. You can make sourdough no knead bread. Replace the yeast with about ¾ cup (180g) sourdough starter and then follow the no knead directions.
My sons and I made this recipe over Christmas week. You actually made it twice, once with instant yeast and regular yeast. Very tasty. Easy to make!
I made this bread today and the inside is delicious, but the outside is extremely hard! What did I do wrong for it to be so hard? Any suggestions? Thanks
I’m not sure you did anything wrong, Becky. The crust of this bread is supposed to be, well… crusty. I’m not sure if yours was especially hard.
Kneading is easy for me – starting a recipe that requires waiting until the next day…Difficult. When this dough rests for 12-18 hours recipe says “room temperature.” My house is pretty cool in the winter. What is the minimum surrounding temperature necessary for the yeast to do its thing?
The ideal room temperature would be 70°F to 75°F. You could heat your oven to 200°F and then turn it off and place the dough in side the oven to rest. If your room is very cool you can let it go for the full 18 hours of resting time.
Beat storage options? Or else I’m going to have to eat the whole loaf on my own. Lol.
Well, I wouldn’t blame you if you did! One option is to slice the loaf and freeze it in a plastic bag. Otherwise, this bread keeps in a bag at room temperature for a day or two, in the refrigerator for a week. It’s always softest the day it is baked. After day 2, I recommend toasting it.
Hi Meredith. I have made this recipe several times in my 5 qt dutch oven. If I want to make 2 loaves using my 3 qt dutch ovens, would anything change in cooking times? Thank you.
Hi Kim, if you’re making smaller loaves, the cooking time will probably be less. I would cook with the lid on for 25 minutes, remove the lid and check it at 15 minutes more. It should be nicely browned and sound hollow when tapped on the bottom. You can also test the internal temperature which should be around 200˚F.
ML
Before trying this recipe, I had never made bread. This recipe is AMAZING!!! It is so simple, and with just a few ingredients, you can create something that looks so beautiful and tastes INCREDIBLE!!!
This looks so good. I have never made bread before so…. Will give it a try.
I have a “stupid” question.
Is a stand mixer needed.
No it only takes a few minutes to mix this by hand. No mixer needed.
I’m going to try it with King Arthur Measure for Measure gluten free flour since I am gluten free. I made a recipe yesterday that needed typical rise time and included eggs. This is intriguing. I will post here to let you know how it works out. I love most all your recipes and hope you include more gf here. Thank you, Meredith!
Hi Meredith, before I attempt this recipe I have just one question.
My Dutch oven is only seasoned cast iron, not enamel. Can I use it
and is there any thing special I will have to do to it? Maybe brush
the inside with bacon grease, one of my moms old favorites.
Hi Thomas. I worry that the bacon grease will burn at such a high temperature and you’ll get a lot of smoke. I would just transfer the bread to the Dutch oven with the parchment paper, leaving the parchment inside, and then you’ll know for sure it won’t stick.
ML
Hi Meredith I just made your bread the only difference that I did was put dillseed in it and it was excellent we will make it again thank you for the recipe. JR
I have been wanting to try this type of bread recipe. I am impressed with the ease and the flavor of the bread. Really good.
I thought I’d give this a try and I am glad I did. It was so easy. I enjoyed and will definitely make it again.
This bread is delicious! Had it with soup for dinner. There were no leftovers. Will be baking this often..
Hi Meredith,
I use active dry yeast, so you were telling others that it should go into water first? Can it be added to the water that your adding to the dough? If so, does it have to sit for so long, or can it be added immediately?
Also, I don’t know what I’m doing wrong.. have attempted to make this twice & had to throw it out. After letting it sit for 18 hours, & for the two hour resting period, it became very flat & it looked like the size of a pizza… lol.
Pls HELP!!
Thank you
Hi Dianne. It sounds to me as though your yeast might be dead. You can test your yeast by “proofing” it in some warm water. Put the yeast in water that is about 90˚F with a pinch of sugar and let it sit for about 15 minutes. You should see foam on the top of the water by that time. If you don’t, then the yeast is dead and won’t perform for you. It is best to mix the active yeast with the water first, but it’s not critical.
ML
We love this bread. I’m so glad I read down through all the comments. I’m going to try making a half recipe the next time. It’s only 2 of us and the bread is so good when freshly baked.
HI Meredith – I have been experimenting with European flours lately since returning from Italy. Would a semolina flour or other European type work like bread flour?
Thanks.
Hi Lisa. All flours are different – even different brands. It’s an interesting area of exploration, and honestly you only really know the differences they bring once you use them. Just like wines, flours have varietals that have different properties and flavors. True semolina flour is flour made from durum wheat and is high protein, so it would be a good bread flour. Do look at what you have, however, since the word “semolina” has been used to describe a variety of different flours, from corn to other wheats.
ML
Hi Meredith….love the recipe! Very easy and delicious! Can I knead this dough instead of letting it sit for 12-18 hours? If so…how can you tell how long to knead it, and can you knead it too long? Thanks so much!
Hi Chuck. I’ve never tried kneading this dough recipe but there’s no reason why you can’t. If it’s too wet and sticky, that might lead you to just let it ferment on its own. Whenever I knead a dough, I knead it until I can stretch the dough gently between two fingers and it doesn’t tear. Then, you should rise the dough until it has doubled in bulk before punching it down and shaping it. Let it rise again and then bake. Good luck!
Hi Meredith, I love your recipes and all have turned out beautifully but I think I need your advise on this one. When I turned my dough out onto the floured parchment, it was runny and impossible to shape into a ball. Should I add more flour at this point to get it to a point where it can be ball-shaped? Thanks in advance.
Hi Annette. Did you use bread flour and did you measure the flour with a cup measure or did you weigh it? Bread flour absorbs more liquid that all purpose flour, yielding a firmer dough. No knead bread is never super firm and it’s not the sort of bread dough that is easy to shape, but it shouldn’t be runny. I can only suggest making sure you use bread flour and if it seems runny to you when you first mix it, add a little more flour. You can add a little more flour at the end if it seems runny, but that will be more frustrating than if you add it at the start.
I would like to use my Emil Henry Cloche for this recipe.. any suggestions for modifications to recipe? cook time? etc?
Also .. I’d like to make a raisin pecan version.. any suggestions?
Hi Michael. No need to modify the recipe for your cloche – just go ahead and use it after pre-heating it in the oven. I have a few no knead bread recipes on my website, which you can find by searching for “no knead”. The fruit and nut one is here.