Brownie Pops

What's more fun than a brownie? How about a brownie on a stick? For those who hate to get their fingers chocolatey, brownie pops are the perfect treat.

Jump to Recipe (or scroll for photos and riveting information...)
Advertisement - Continue Below

I’m not sure I have ever turned down a brownie. Call me a girl who just can’t say “no” if you must, but that’s the truth. The fudge-y chocolate treat is just too much for me to resist. Now, I’m a tidy girl and a tidy cook, but when it comes to a brownie my fastidious nature goes out the window. Chocolate on my fingers? No problem. I have a built-in solution for that and am not above licking my fingers to make sure I indulge in every morsel of happiness offered to me. However, put a brownie on a stick so that I can get my chocolate fix without leaving evidence behind for others to notice – even better!

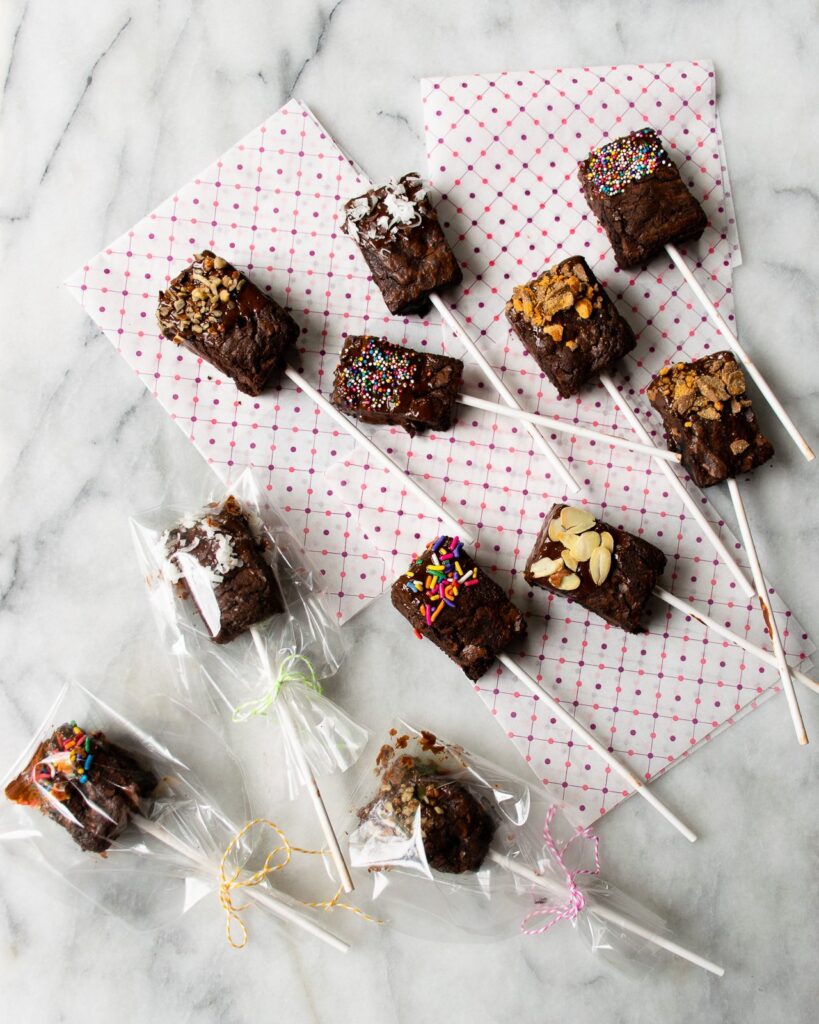
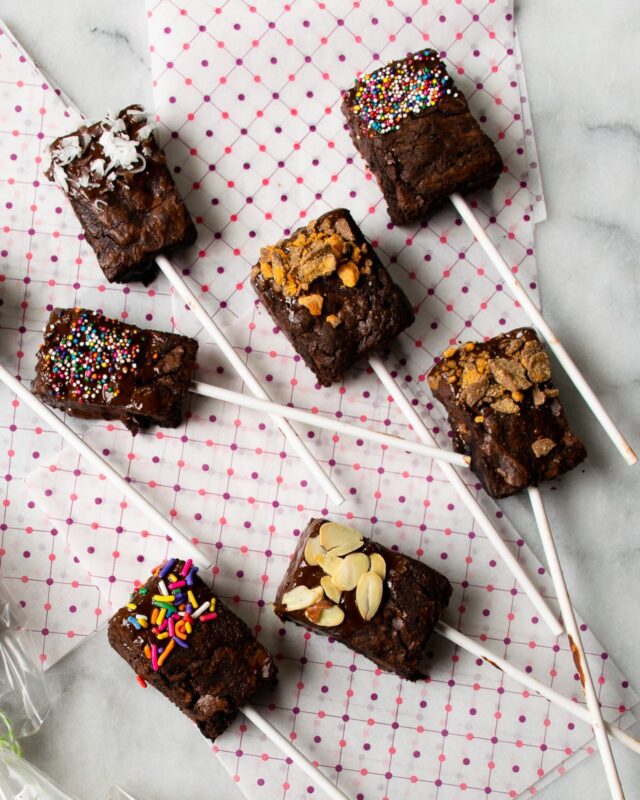
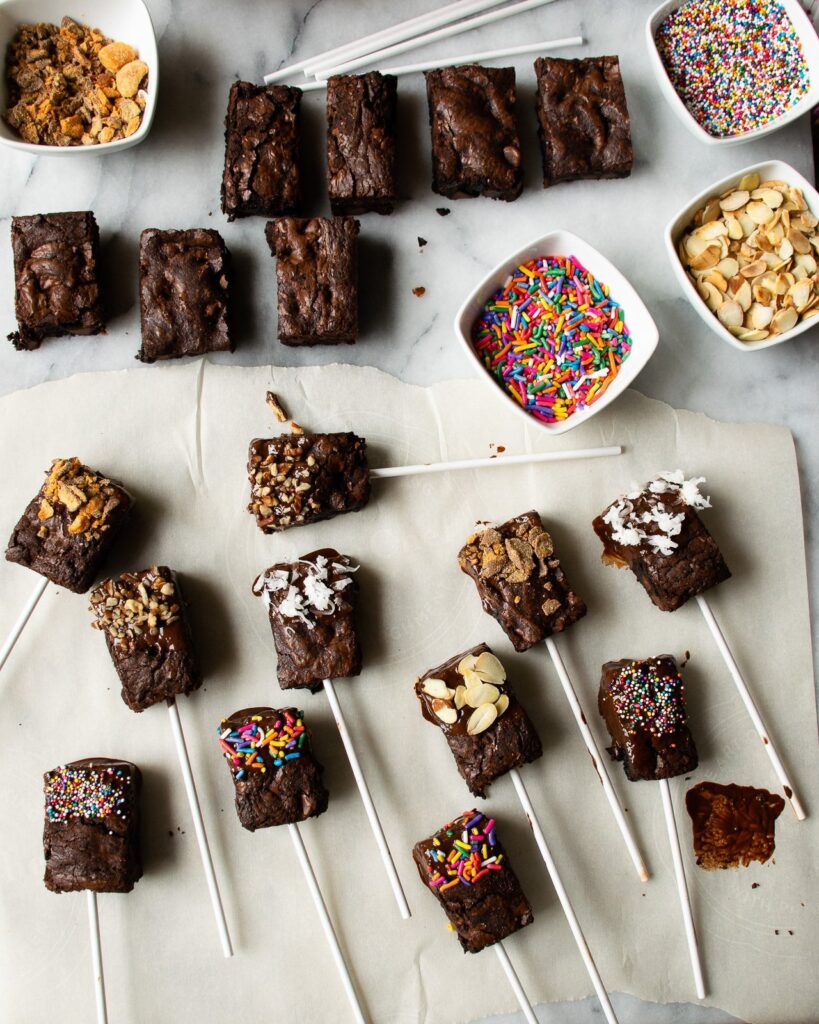
Brownie pops are not just for those who don’t like to lick their fingers, however. They are cute and fun and make a great item to sell at a bake sale. They really are easy to make – you just need to make brownies – and then you can have some fun coating them. Use a 9-inch square baking pan and bake the brownies long before you plan to decorate them. The key to easy decorating is to have a brownie that has cooled completely and is well-chilled. The stick stays put in a cool brownie, but will slide right out of a warm brownie. So, make the brownies a day ahead of time if you can and keep them in your refrigerator.

Brownies being cut into little rectangles on a marble surface with lollipop sticks and a knife.

Then, prepare for some quick and easy fun the next day. Gather your assorted toppings and melt some good-quality chocolate. Good-quality chocolate is, of course, a subjective matter. I like to use a chocolate that is at least 70% cocoa because not only is it delicious, but it can be quick-tempered if you are so inclined. Tempered chocolate keeps its shine and won’t turn cloudy, which is nice. This recipe includes instructions for a quick-temper method without the use of a thermometer, but if you just want to use chocolate chips and melt  them quickly, go for it. 

Brownie pops being decorated with various toppings.

Once you’ve decorated the brownie pops, they will need time to set up, but that doesn’t mean you shouldn’t do a little quality control, right? It’s a hard job, but no responsible cook or baker would expect someone to eat something they haven’t already tasted. 😉

Brownie pops on a marble counter with red polka dot paper and some in cellophane wrappers.

Brownie Pops

  • Prep Time: 10 m
  • Cook Time: 30 m
  • Cooling and Decorating Time: 7 h
  • Total Time: 7 h 40 m
  • Servings:
    24

Ingredients

  • butter to grease pan
  • 3 eggs
  • ¾ cup oil
  • cups sugar
  • ¾ cup cocoa powder
  • ¾ cup all-purpose flour
  • ¾ teaspoon baking powder
  • ¼ teaspoon salt
  • 1 cup mini semisweet chocolate chips
  • 12 ounces good quality chocolate preferably 70% cocoa
  • 24 lollipop sticks
Toppings:
  • assorted sprinkles
  • toasted coconut
  • toasted nuts
  • broken pretzel pieces
  • toffee pieces

Instructions

  1. Pre-heat the oven to 350°Grease a 9-inch square baking pan with butter. Then, line the pan with parchment paper, allowing the paper to drape over two opposite sides of the pan by two inches.
  2. Combine the eggs, oil and sugar in a bowl. In a second bowl, combine the cocoa powder, flour, baking powder and salt. Add the dry ingredients to the wet ingredients and stir until just combined – do not over mix. Fold in the mini chocolate chips.
  3. Pour the batter into the prepared pan.
  4. Bake at 350°F for 25 to 30 minutes, until the batter has set in the middle. (To test this, insert a skewer into the center of the brownie. It should have no sticky batter on it when you remove it.)
  5. Transfer the pan to a cooling rack. Let the brownies cool in the pan for 10 minutes. Run a knife around the edges of the brownies and let them continue to cool completely in the pan.
  6. When cooled, lift the brownies out of the pan, using the parchment paper as handles. Refrigerate the brownies for at least 6 hours.
  7. Cut the brownies into 24 rectangles, but dividing the brownies four ways in one direction and six ways in the other.
  8. Place the toppings into small bowls or dishes.
  9. Set up a double boiler by placing a metal bowl over a small pot of simmering water. Make sure the bottom of the bowl is not touching the water. Place two thirds of the chocolate into the bowl. Let the chocolate sit until it starts to melt, then stir until completely melted. Remove the bowl from the heat and add the rest of the chocolate. Stir until melted to quick-temper the chocolate.
  10. Dip the end of each lollipop stick into the melted chocolate and then push the stick through the middle of the brownie through one of the cut edges. Carefully dip half of the brownie into the chocolate. Then immediately sprinkle some of the toppings onto the melted chocolate. Place the brownie pop on parchment paper to set.

  11. Once the chocolate has set, wrap each brownie in individual cellophane candy bags to give away, or store in an air tight container.

Advertisement - Continue Below

Leave a Reply

Your email address will not be published. Required fields are marked *