What is No Knead Bread?
No knead bread is exactly what it says it is – bread that requires no kneading whatsoever. No knead bread became a craze several years ago when Jim Lahey of the Sullivan Street Bakery in New York City figured out that you don’t have to knead bread dough to get the critical gluten development required for a perfect loaf. Instead, if you have patience, time will do the job. Letting the bread dough rise slowly (very slowly), allows the gluten to develop just as well as kneading it. Hence, no need to knead!
If you’ve tried my recipe for No Knead Bread or Whole Wheat No Knead Bread, you’re in for a treat with this No Knead Fruit and Nut Bread. I’ve tweaked my recipes a little, used both all-purpose flour and whole wheat flour and incorporated dried fruit and nuts into the mix, using the delicious fruit and nut bread from one of my favorite restaurants – Parc in Philadelphia – as the role model.
No Knead Ingredients
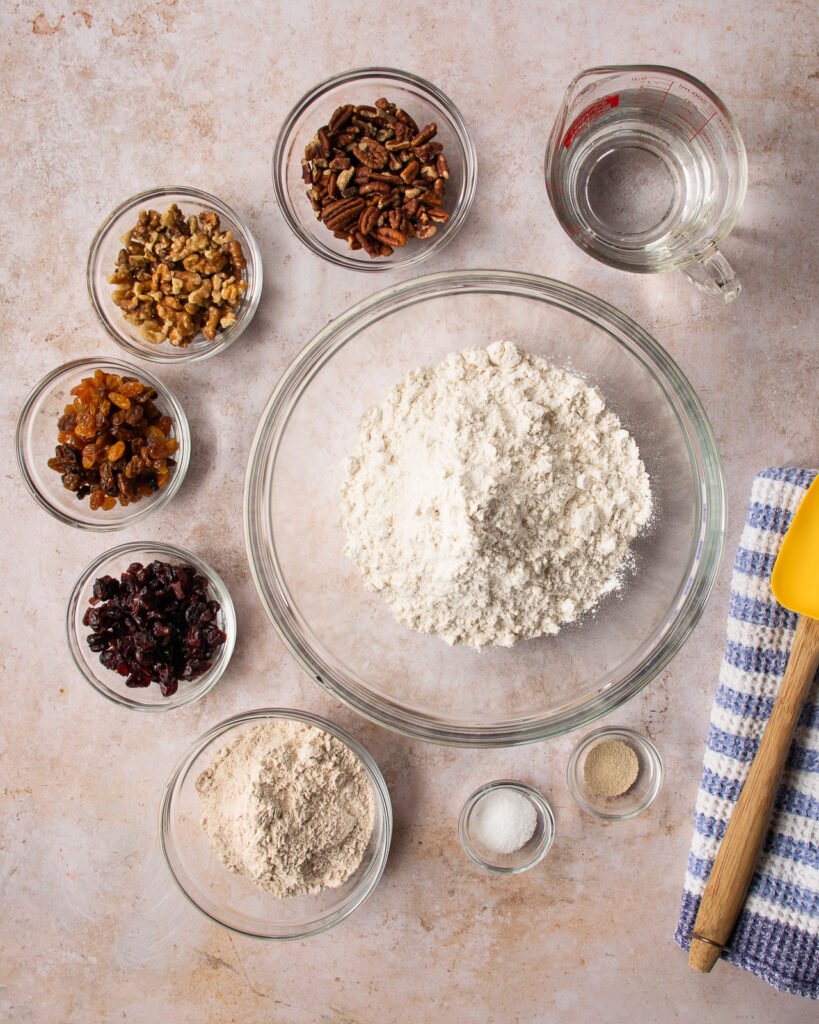
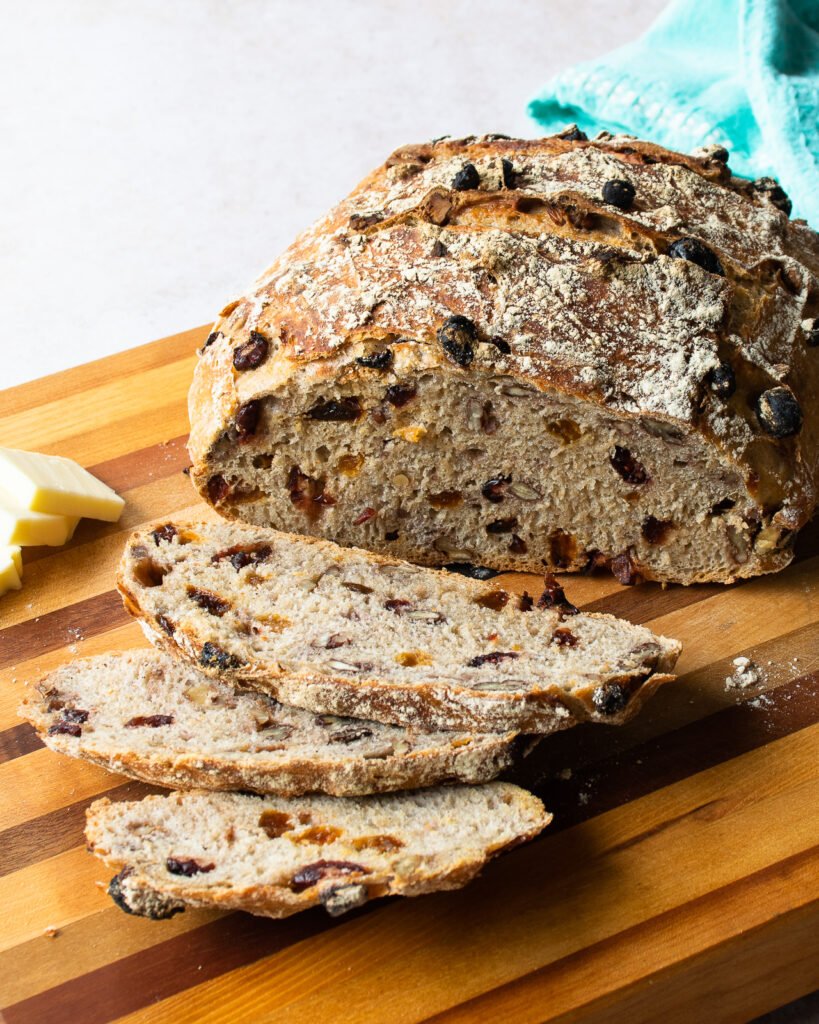
For this recipe, you will need very basic ingredients. It starts with all-purpose flour. I often use bread flour in my recipes, and you can certainly substitute that here, but I wanted a recipe that started with all-purpose for the sake of convenience. Add to that a little whole wheat flour, some yeast and some salt. Those, along with some water, are your basic ingredients for no knead bread. To make it fruit and nut bread, you’ll add two cups (total) of dried fruit and nuts. I use half a cup each of golden raisins, dried cranberries, pecans and walnuts, but you could substitute any dried fruit and nuts that you like and have in your pantry.

Stir, Don’t Knead
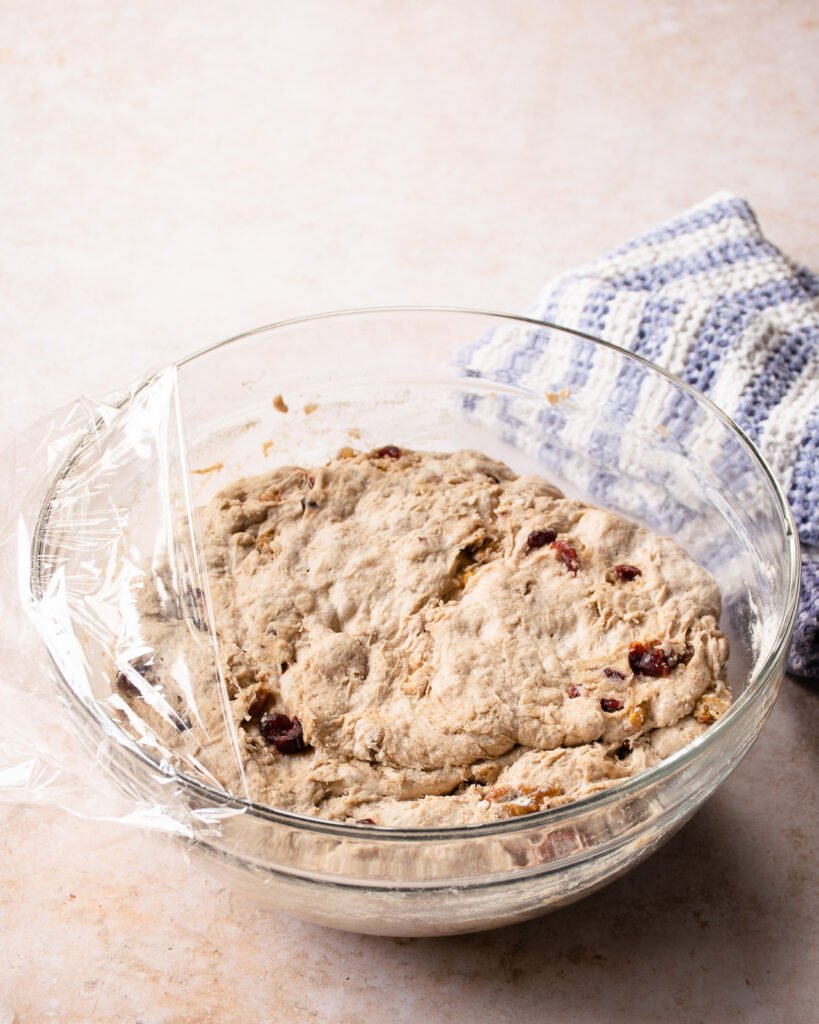
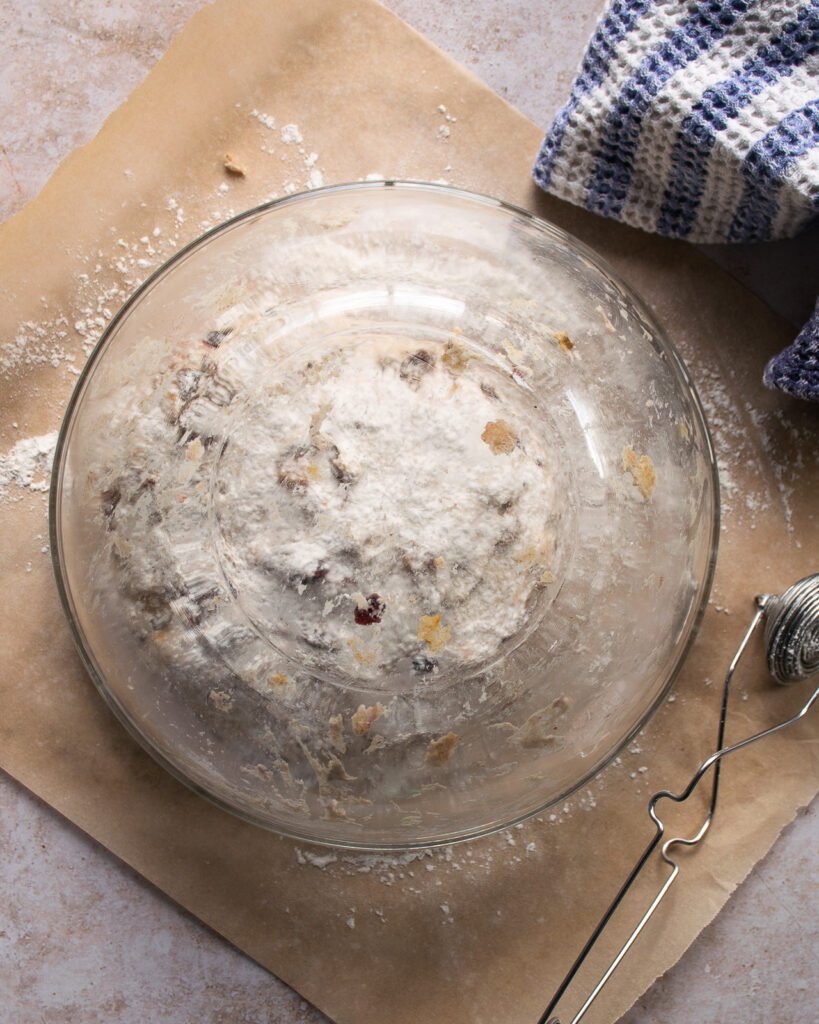
The beauty of no knead bread is that you don’t need a lot of strength, elbow grease or an electric mixer to make it. You do, however, have to stir all the ingredients together until you no longer see any traces of flour. What you end up with will look rather un-extraordinary, but that’s it. Now you wait.
Rise up!
I let the dough sit in a warm spot of my kitchen, covered loosely with plastic wrap for 18 hours. You can go as little as 8 hours or as long as 18, but the longer the better in my books. That allows for more flavor development in the dough.
Shaping No Knead Bread
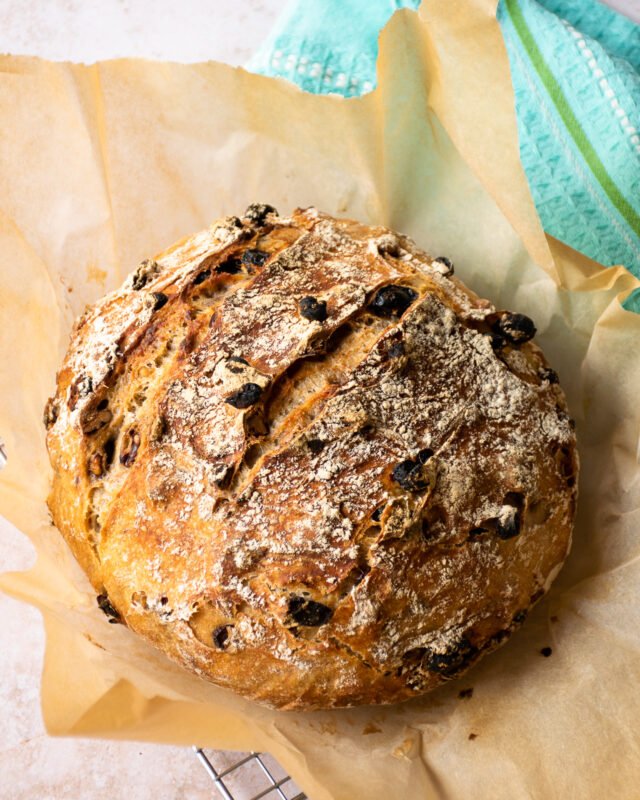
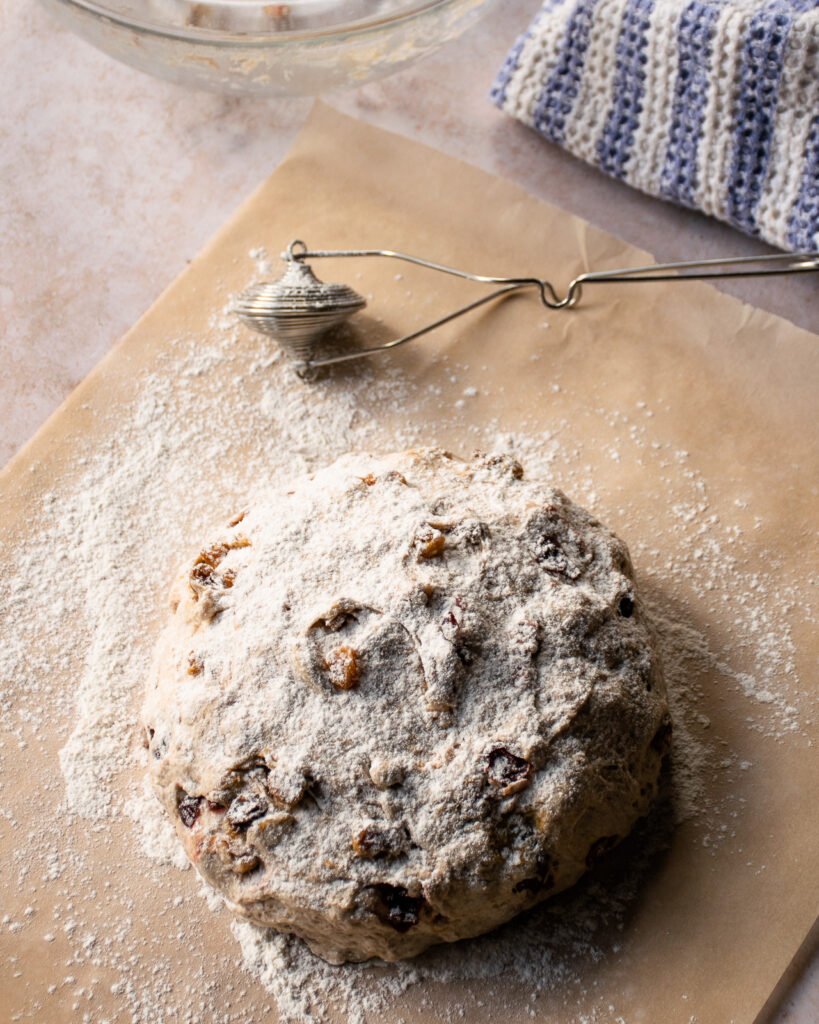
Shaping no knead breads can be the trickiest part of the process. With this recipe, however, the dough is not as loose and sticky as with my other no knead bread doughs. Sprinkle a lot of flour on a piece of parchment paper. (I use my favorite little single-use tool – my flour duster – for this.) Then, turn the dough over on itself a few times and shape it loosely into a round and place the untidy side down on the paper.
A Second Rising
Once the dough has been shaped, it still needs to rest and relax for a couple of hours before going into the oven and it needs to be covered while it rests. You could put a clean towel over the bread, but I find it often sticks, making a mess of your shaped loaf. So, invert the bowl that it rose in over the top to keep it from drying out. With my other no knead bread recipes, I invert the dough into a hot cast iron pot, but with this no knead fruit and nut bread I use the parchment to lift the dough into the pot, baking the bread with the parchment paper. This allows you to actually shape the dough the way you want it and makes managing the dough and a very hot cast iron pot much easier. Before you lift that parchment paper and place the dough into the hot cast iron pot, take a baker’s lame or sharp serrated knife and make two or three slashes in the top of the dough. Doing so will give the steam trapped inside the bread an escape route and allows you to control the look of the bread.
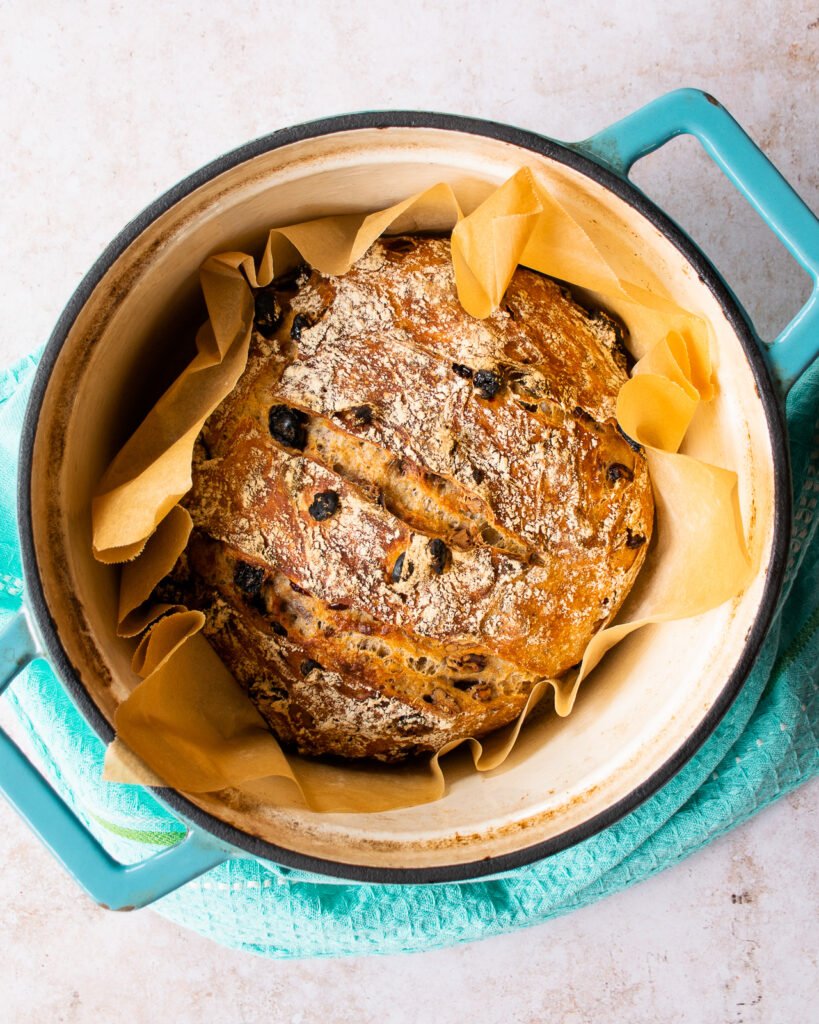
The Best Pot for No Knead Bread
The best pot to use for no knead bread is a cast iron pot. It pre-heats in the oven and gets very hot indeed. The thing about cast iron is that it holds the heat and turns into a mini oven inside your oven. If you don’t have a cast iron pot, you can use any other heavy duty lidded pot that is oven safe to 425ºF. The bread might not get quite as crispy a crust, but it will work. Remember that the diameter of your pot will control the size of your loaf. If you have a very large pot, the bread will spread out more and not rise as high. If you have a smaller Dutch oven, the bread will be forced to rise up.
How to Know your No Knead Bread is Done
After baking the bread in a covered pot at 425ºF for 30 minutes and then for another 10 to 15 minutes without the lid, your loaf should have a nice brown crust and should be completely baked inside. If you’re uncertain, you can carefully remove the loaf from the pot and tap the bottom, listening for a hollow sound. To be absolutely certain, you can insert an instant read thermometer into the center of the loaf. It should read 200ºF and there should be no wet batter on the thermometer when you remove it.
How Long will No Knead Bread Keep?
Well, that depends on how hungry you are.
On a serious note, no homemade bread lasts as long as store-bought bread and that is because it has no preservatives in it. That’s a good thing. Homemade bread is always best the day it’s baked, but this bread should last 5 to 7 days in an airtight bag or container or wrapped well. After day 2, it’s best toasted… delicious actually.


I have a stone crock with a lid. How do you think that would work? I enjoyed you on QVC and now enjoy reading your posts and recipes. Thanks! Virginia
I think it would work just fine! You can actually use any pot for this – the heavier the better.
Absolutely delicious! I added 2 tsp of mixed spice to the dry ingredients and brushed the top with melted butter when I took it out of the oven (then covered it with a tea towel). I didn’t have pecans, so used flaked almonds with the walnuts etc. Thanks so much for a great recipe. This will now be a family favourite!
Great recipe, love this version of the no-knead bread! So hearty and healthy in addition to being delicious AND sooo easy to make. Everyone “kneads” to be on the no-knead bread wagon!
Turned out better than I hoped. Had to wait until yeast was available again.
So quick and easy. Making this to take to my bosses at work. I hope they enjoy it. Opinions about honey butter with this?
I think honey butter would be delicious with this!
Hi Meredith
I just baked this bread and the finished product looks like your photos. Taste is delicious.. Definitely a “Keeper”.
Comment/Questions:
> I let it sit overnight ~ 15-hours. Our house was pretty warm ~ 80 F. It smelled pretty ‘yeasty’ the following morning. Is that to be expected ?
> After I shaped the loaf and covered it for the 2nd rising… then uncovered it 2 hours later, it really flatten out. Is that ‘normal’ ? I considered using my Benetton, but it’s a small one (1-pound loaf)… this one seems heavier/larger.
Comments ????
Hi Doug. Glad you liked the bread. Yes, the dough will smell “yeasty” in the morning. One of my favorite smells! If it flattened out after the second rise, it probably sat for too long. The yeast can exhaust itself and the dough will fall in that case. Perhaps the room was a little warm, which would have sped up the activity. No trouble – just do the second rise for shorter. I think a 1-pound banneton is probably too small for this loaf, so best to let it rise on the countertop until you transfer it to the pot. Keep up the baking!
Re:
If it flattened out after the second rise, it probably sat for too long. The yeast can exhaust itself and the dough will fall in that case. Perhaps the room was a little warm, which would have sped up the activity.
Yup… we were in a heat-spell (inside temps ~ 80’sF).
Had a 1-inch slice; toasted… for a mid-morning snack: Delish !!!
Absolutely delicious! I use pecans, sultanas and cinnamon. I love how the house smells of yeast while its rising, it has been great to work on this during our lock down here in Melbourne.
It is now a favourite and we go through a loaf a week.
Thank you for sharing this recipe.
Does this loaf freeze well for gift giving in a couple of weeks?
Hi Cynthia. You could freeze this loaf. Just let it cool completely and then wrap it really well in plastic and then aluminum foil.
I want to try this recipe but only have bread flour will that work
Hi Jerry. Bread flour will work perfectly.
What size pot is pictured? Thank you!
Hi Andrea,
I use a 6-quart cast iron Dutch oven in the photos.
ML
Oh my, looks interesting. After waiting almost a whole day for sourdough to rise, I think I have enough patience to try. Would you recommend for any adjustments if I were to replace all-purpose flour with bread flour?
Hi Jayne, you’ll be find using either AP or bread flour. They have similar weights per volume. The only tweak you might need to make is to the amount of liquid. Bread flour tends to absorb more liquid, therefore making a drier dough. If you use bread flour instead of AP, you might need to add a touch more liquid.
Followed the recipe as provided, my first time making bread with yeast! The results were ok, but not great. The bread was somewhat dense and the nuts and dried fruit were not evenly dispersed throughout the loaf…not sure why that happened. The dough rested the max time – 18 hours, but the flavor was lacking…may have benefitted by a little sugar or more salt. Any tips?
Hi Laura. The flavor of dough is affected by the flour you use and can also be affected by over-kneading or using too much yeast. Since this is no knead dough, kneading is not the problem. This dough also uses very little yeast, so that won’t be the answer either. You might try using a different brand of flour and making sure that your yeast is still active. You can do that buy testing the yeast in a small bowl of warm water with a little sugar. It should foam in about 10 minutes or so. If your yeast is not active enough, the dough will be dense and that can cause a dull flavor. You are welcome to add a little sugar to the dough, which will make it a sweeter bread. The recipe is not intended to be sweet, but to be a savory bread with fruit and nuts included. Don’t add more salt because salt inhibits yeast activity and you’ll get less of a rise. Try dispersing them a little more evenly when you turn them into the dough.
Hi – I have made a loaf which is into it’s long prove – I have a couple of questions:
1. I measured my cup of flour then weighed it. My cup measure is a Tupperware one so is a US measure – my cup of flour weighed 144g. My dough was so stiff I had to add some extra water as it just wouldn’t incorporate all the flour – then I Googled “what does a cup of flour weigh – US” – well I got a plethora of differing options: 110g; 120g & 136g – I stopped looking at that point! So no wonder my dough was too dry, I probably had too much flour – hope I added enough water to rectify the balance. Please tell me your gram weight of a cup of flour?
2. A friend who ba,esca logic bread advised me to let it rise in the fridge for the 18 hours – what are your thoughts on this?
Thanks for what looks like a wonderful recipe – can’t wait to bake it xx
– Bev
Hi Bev. Different brands of flour weigh different amounts because of the particle size and density, so it gets tricky fast. I write my recipes with volume measurements because most American cooks don’t have a scale or like to weigh their ingredients. I do always measure the same way every time I use a volume measurement and you can learn more about how I do that here: https://bluejeanchef.com/cooking-school/how-to-measure-ingredients/ I tend to use King Arthur Flour and their weight per cut for both all purpose and bread flours is 120g. You did the right thing by just adding more water to the dough. I should start offering weight measurements for my bread baking recipes going forward.
As for rising in the fridge, you can do that for regular breads and it will slow the rising down significantly, but this no knead bread uses so little yeast and needs the 18 hours at room temperature to allow for flavor and gluten development without kneading.
Hope it turned out well and that you enjoyed it.
ML
I shocked myself. First time bread maker. It turned out perfect! Thanks for sharing.. ✌🏼
Can I add pumpkin puree to this recipe? And if so, how much would you add? Would I need to make any other adjustments?
Hi Nancy. Adding pumpkin purée to this bread would be tricky. You would have to take out some of the water because the pumpkin adds moisture to the dough. You could give it a try, but I’m afraid without having attempted it myself it’s hard to give you advice. You could try mixing pumpkin purée with the water and using that mixture as your liquid. Start by adding the quantity of water required in the recipe and add more to get the dough to the right consistency. It’s tricky.
Hi, planning to make this at weekend. Could you use a standard loaf tin? I do have a cast iron pot but I’d prefer it to be “loaf shape”. If this will detrimentally affect it though, I’ll go with cast iron, but your advice & experience would be appreciated
Hi Emily. The cast iron is important to this particular bread. The intense heat and “oven within an oven” effect that the pre-heated cast iron pan provides helps the bread with its final rise in the oven.
ML
Brilliant thank you, I’ll go with the cast iron then 👍🏻
I am wondering if I can convert this to a sourdough recipe by leaving out the yeast, cutting back the flour and water by 20%, and then adding that amount of sourdough starter to the mix. Or do you think I would be better to also add the yeast???
Hi Pat. Converting recipes to sourdough is a little tricky, but totally do-able. Whether or not you’ll need to keep a little yeast in the dough depends on how robust your starter is. You have the right idea on reducing the water and flour and replacing it with starter. My starter is equal parts BY WEIGHT of flour and water. That means that every time I feed my starter I feed roughly ⅔ cup of flour and a scant ½ cup water. If I were to add a cup of starter to the dough, I would weight it first (1 cup of my starter weighs about 240g). Then, divide that weight in half, which is the weight of the water and the flour individually (120g flour = a little more than ¾ cup or a scant cup; 120g water = ½ cup). Then, remove that much flour and water from the dough. If you don’t have a scale, give the following a try: remove ¾ cup flour and ½ cup water from the recipe and add in 1 cup of starter. Give it a go! If the bread doesn’t have enough rise, then you might need to add a little yeast and experiment next time.
Loved this recipe & being a nut fiend I added half as much nuts again.
So simple to make & came out perfect.
I will now be trying adjustments with banana water or coffee.
Hi Meredith
I haven’t been baking bread for very long. My husband wanted a raisin bread and being new to No-Knead breads I thought this looked really good. I baked it this morning after mixing it yesterday. Well, sorta! I got it mixed up and there sitting at my elbow was the bowl of raisins! YIKES. Needless to say, it was hard to mix them into the dough. But I’m here to tell you that the bread tastes Great! I can only imagine what it will taste (and look) like when I actually do it right next time. There WILL be a next time! Thank you for posting this recipe! (BTW, I loved watching you and David interact on QVC!)
Made this bread yesterday and had it for breakfast this morning with a nice cup of coffee. It is delicious!! You can taste the flavor of the bread and than comes the sweet taste. Nice and chewy and crunchy on the top. Some breads have soft tops after the sit covered. It is a keeper. My husband who is tough on grading recipes gave this a 9. Thank you for this great recipe!
Curious as to the crust. Maybe less rising time ? It was like a saw cutting pieces off ? Thanks
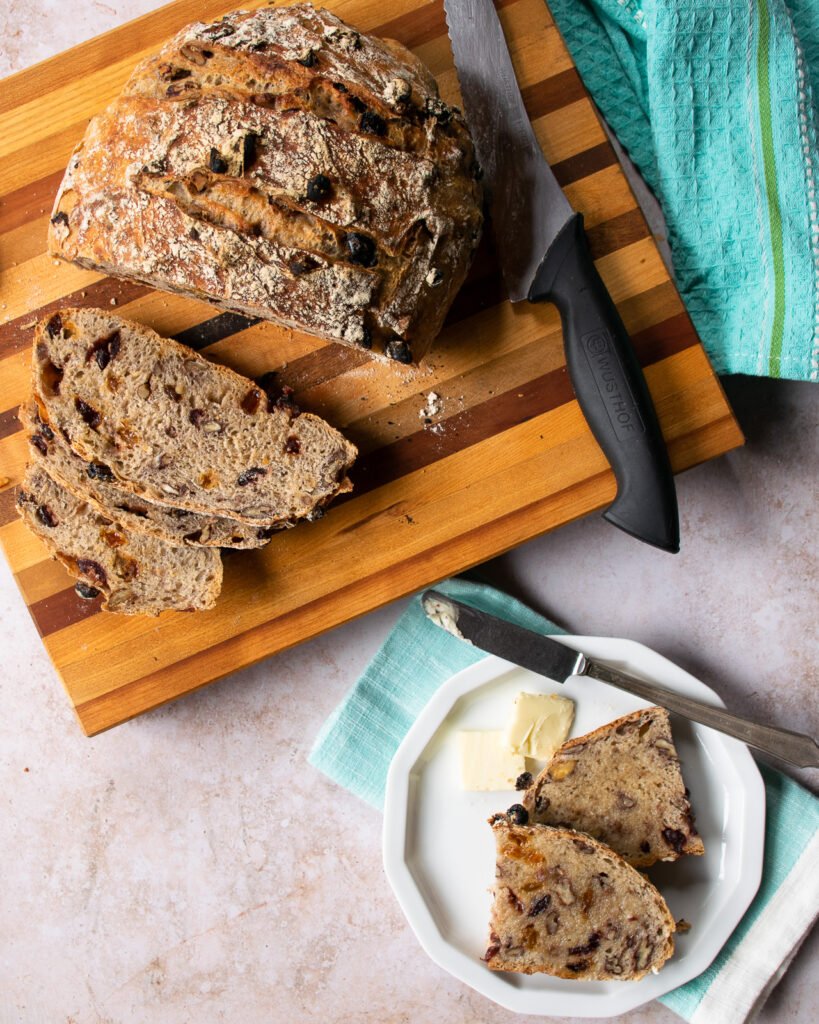
This is a hearty loaf of bread with a thick crust. It is best to cut it with a serrated knife. If the crust was too hard, you may have baked it a little too long.
Can you make this without the whole wheat flour…I never have any???
Yes, you can!
Okay I used that knife. And cooked accordingly. Thanks I did add more whole wheat flour tho
I bought a Dutch oven. In part for this loaf. As the other one I just had a heavy duty “lobster pot” not cast iron. The crust was much easier to cut. But other than being hard to slice. I think I like using the “lobster pot” better. Although I did not kneed it this round either. Where I had before. I like the dense version better
Thanks for the recipe
Thanks for the recipe, going to try it this weekend. Looking for a recipe to replicate a fruit loaf I tried recently which was extremely expensive and delicious and also contained rye flour so I will swap out the whole meal for rye. I’ll let you know how it goes.
Do you think the water has to be cold/room temp or warm before adding to make the dough?
Many thanks.
You can use lukewarm tap water for the recipe.
Have made this bread before and me and my bread junkie husband really love it toasted with a bit of butter. Have not made it for a while because of being sick for a while and when I Dennis ( the junkie) that I was going to make it I thought he wise going to propose again.
Thanks for this. 😘
Made this last night/today (10/15/22). I have made other no knead breads before, I was a little worried this bread was so dense. I had to add additional water to wet all the flour and it was a stiff dough. It did not rise overnight as other NKBs I have made. Folding after the overnight was not what I would call folding. Not sure maybe I needed more water.
After baking; this bread looked amazing. The taste is great too, my wife said it’s like a dessert bread. I will definitely make again.
So glad it worked out for you, Ed. 😊
Could I use a stainless steel dutch oven ?
Hi Deb. You can try, but stainless steel does not retain the heat the way that cast iron does, so it might cook differently. If you do give it a go, make sure you pre-heat the Dutch Oven first and once the bread is in the pot, cover it immediately to trap the steam. I wouldn’t use the stainless steel Dutch oven if it is non-stick, but if it is a heavy metal pot, it might be ok.
I want to make this recipe but the only yeast I have is yeast that needs to be bloomed Will this work with this recipe and if so how do I do it. Thanks in advance
Sure you can use that yeast. You can test or proof the yeast ahead of time in a little bowl of warm water with a pinch of sugar. The yeast should foam if it is still active. If you know your yeast is active, you should be able to just add the measured amount of yeast to the other ingredients. If you want to add yeast that is “bloomed”, just use some of the water from the recipe to bloom your yeast and add that to the remaining ingredients.
ML
How can I add cinnamon to this fruit and nut bread? I have the Vietnamese cinnamon…which is stronger, I believe.
Thanks
You can add the cinnamon when you add the nuts and dried fruit.
How much cinnamon would you add to this bread?
I would not add too much, Mary. Cinnamon inhibits yeast activity. Maybe somewhere between ⅛ and ¼ teaspoon.
I would like this to taste like a cinnamon raisin bread. How would I accomplish this?
Instead of the different dried fruits, add just 1 cup of raisins and 2 teaspoons of cinnamon to the dough. If you like it a little sweet, you can also add a few tablespoons of brown sugar.
Well, it wasn’t as pretty as yours…but that didn’t stop us!
Terrific! Just made first time – easy and reliable directions. I’ve added this recipe to my standard rotation of breads – thanks from Toronto.
I made this but added cinnamon, figs, dates, pepita seeds, sunflower seeds, chia seeds and slivered almonds to the recipe and it is by far, the best thing I’ve ever baked in my life – the best!
Hi,
I use King Arthur Flour and it weighs 120g per cup, which appears to be 20 grams less per cup than listed in the recipe. Should I use more flour to equal the grams listed in the recipe instead of by cup? I made it using 360 grams (3 cups) of KAF All Purpose and 120 grams (1 cup) of KAF Wheat and the dough was very wet. I assume I should have used the amout in grams listed in the recipe.
Thanks,
Lisa
Hi Lisa,
I recommend using the weights that I’ve listed. There are so many different opinions on the weight of flours on the Internet, depending on who is doing the weighing. I know KA says that their cup of flour weighs 120g, but I always find that when I personally weigh a cup of flour (usually KA flour), it weighs 140g. That’s why I prefer to bake with weights than volume measurements. For my bread recipes, you can always count on the fact that I’ve tested the recipes using weight measurements. Hope that makes sense.
ML
This bread looks like it would be delicious. Do you think I could make it as a sourdough with starter instead of yeast?
Yes, I think you could take my sourdough recipe for the procedure and incorporate the fruit and nuts from this recipe when you add the salt. Continue to do the folds and bake as per the sourdough recipe.
ML
Can this bread of recipe hold up if I want to put dried fruit soaked in Brandy. My favorite is Cherry Brandy.. I just made a no need dried fruit loaf. But seeing this recipe using my Dutch oven to cook it in makes it sound even more amazing. So my question is drained liquor soaked fruit work. I most likely will make it anyway just to see.
Hi Penny. Yes, if you drain the soaked fruit well, there’s no reason why it wouldn’t work. Sounds delicious!
ML